Install LAMP server on Ubuntu

All the components of the LAMP server are available to install using the default system repository of Ubuntu. Hence, we can configure the environment without adding an extra repository. However, before moving forward, just run the system update command to ensure the system rebuilds the APT package index cache.

sudo apt update

Install Lamp server

We can install LAMP server components one by one on our Ubuntu system. However, it is a time-consuming process, hence to make it short here we are using a single command. That will not only install the LAMP server but also enable and start all the required services.

sudo apt install lamp-server^ php

The above command will select all the required packages to set up Apache, MySQL, and PHP on your system.

Uninstall the LAMP Server

Well, when it comes to uninstalling the LAMP server completely from your Ubuntu system, we can use the given command:

sudo apt autoremove --purge apache2* mysql-server* php*

How to Convert PNG, JPEG to WebP in Linux?

Webp is an open-source image format in Linux which supports lossless and lossy compression for images on the web.

One of the best practices to optimize the website performance is using compressed images.

This article will cover how to use webp image format for creating compressed and quality images for the website.

Installation

The webp package is already available in the official ubuntu repositories. Run the command below to update the Ubuntu repository to the latest index and install webp package.

sudo apt install webp

Converting image to webp format

Using the cwebp tool, an image can be converted into webp format. Run the cwebp command with option -q to define the quality of image and -o to define the output file.

In this example, I have used image file linux.png and linux.jpeg file to convert in webp format. You can choose your image name accordingly.

cwebp -q 60 linux.png -o linux.webp
cwebp -q 60 linux.jpeg -o linux1.webp

Converting webp image to png and jpeg format

In the previous step, we converted jpeg and png images to webp using cwebp utility tool. Now we will use the dwebp tool to convert webp images into png and jpeg format.

Use the dwep command with the option -o to create png and jpeg image format from webp. In the example, image.webp is used for the conversion.

dwep image.webp -o image.png
dwep image.webp -o image.jpeg

How to disable window move with alt + left mouse button in XFCE

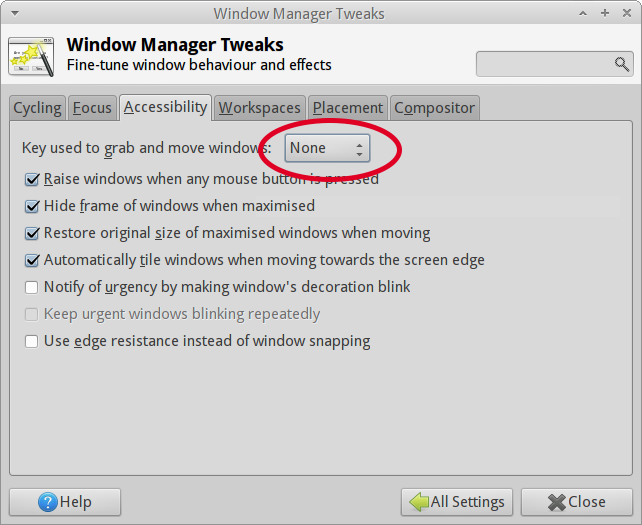
If you go to the Xfce menu and choose settings > settings manager > window manager tweaks > accessibility, you can select another key instead of alt to move the windows or choose none at all. This should be just what you want.

You can also use xfconf-query to set easy_click to none (or another key) on the command-line:

xfconf-query -c xfwm4 -p /general/easy_click -s none

In some programs, like Photoshop Alt + left mouse key used to modify some data and it is very important to disable window move with alt + left mouse button in XFCE for correct work of programs.

Ventoy – open source tool to create bootable USB drives

Ventoy is an open source tool to create a bootable USB drive for ISO/WIM/IMG/VHD(x)/EFI files.

With ventoy, you don’t need to format the drive again and again, you just need to copy the ISO/WIM/IMG/VHD(x)/EFI files to a USB flash drive and load them directly.

You can copy many files at the same time, and ventoy will give you a boot menu to select them.

Official WebSite: https://www.ventoy.net/en/index.html

How to enable remote connections to MySQL server

Enabling remote connections to a MySQL server involves a few steps:

1. Configure MySQL Server

By default, MySQL server is configured to listen to the loopback IP address 127.0.0.1, which means it only accepts connections from the local machine. To allow remote connections, you need to modify the MySQL configuration file (my.cnf or my.ini or 50-server.cnf), typically located in /etc/mysql/ or /usr/local/mysql/etc/ or /etc/mysql/mariadb.conf.d.

Look for the following line in the configuration file:

bind-address = 127.0.0.1

And change it to:

bind-address = 0.0.0.0

This allows the MySQL server to listen on all available network interfaces.

2. Grant remote access to MySQL user

By default, MySQL server creates a user root with full administrative privileges, but it only allows access from the local machine. To enable remote access for this user, you need to grant it permission to connect from a remote IP address.

Log in to the MySQL server as root user and execute the following command:

GRANT ALL ON . TO 'root'@'%' IDENTIFIED BY 'yourpassword';

This grants the user root access to all databases and tables from any IP address (%). Replace ‘yourpassword‘ with a secure password of your choice.

3. Restart MySQL server

After modifying the configuration file and granting remote access to the user, you need to restart the MySQL server to apply the changes.

On Ubuntu or Debian, use the following command:

sudo service mysql restart

On CentOS or Fedora, use:

sudo systemctl restart mysqld

4. Open MySQL port on firewall

If you have a firewall running on the MySQL server, you need to open the port that MySQL server is listening on (usually port 3306) to allow incoming connections.

On Ubuntu or Debian, use the following command to open the port:

sudo ufw allow 3306/tcp

On CentOS or Fedora, use:

sudo firewall-cmd --add-port=3306/tcp --permanent
sudo firewall-cmd --reload

Once you have completed these steps, you should be able to connect to the MySQL server remotely using the root user and the password you set in step 2.

However, note that allowing remote access to the MySQL server can pose a security risk if not properly secured.

Therefore, it is recommended to only allow connections from trusted IP addresses and to use a secure password.

Install Wireguard on Debian 11

First update package list and upgrade your operating system:

sudo apt update && sudo apt upgrade

To install Wireguard use command:

sudo apt install wireguard

Now check if Wireguard installed correct:

sudo modprobe wireguard

If this command dose not show anything, Wireguard installed correct. If You get error like this: modprobe: FATAL: Module wireguard not found in directory /lib/modules/4.19.0-12-686, install this package:

sudo apt install linux-headers-$(uname --kernel-release)