1. Install Flameshot on your Linux:
sudo apt install flameshot
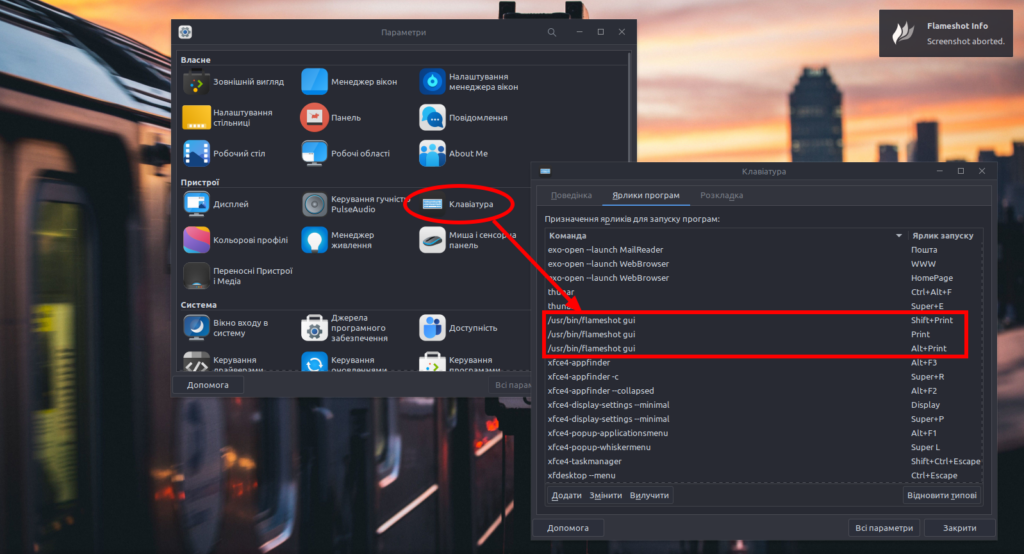
2. Go to Settings -> Keyboard -> Shortcuts and add command /usr/bin/flameshot gui to key PrtScr (Print)
/usr/bin/flameshot gui
1. Install Flameshot on your Linux:
sudo apt install flameshot
2. Go to Settings -> Keyboard -> Shortcuts and add command /usr/bin/flameshot gui to key PrtScr (Print)
/usr/bin/flameshot gui
In this GitHub repository you can find free and open public APIs which you can use in your projects: https://github.com/public-apis/public-apis

A collective list of free APIs for use in software and web development
GitHub repository: https://github.com/public-apis/public-apis
Self-hosting is the practice of hosting and managing applications on your own server(s) instead of consuming from SaaSS providers.
This is a list of Free Software network services and web applications which can be hosted on your own server(s). Non-Free software is listed on the Non-Free page.


Ventoy is an open source tool to create a bootable USB drive for ISO/WIM/IMG/VHD(x)/EFI files.
With ventoy, you don’t need to format the drive again and again, you just need to copy the ISO/WIM/IMG/VHD(x)/EFI files to a USB flash drive and load them directly.
You can copy many files at the same time, and ventoy will give you a boot menu to select them.
Official WebSite: https://www.ventoy.net/en/index.html
In this list we will show open source alternatives to ChatGPT.

Enabling remote connections to a MySQL server involves a few steps:
1. Configure MySQL Server
By default, MySQL server is configured to listen to the loopback IP address 127.0.0.1, which means it only accepts connections from the local machine. To allow remote connections, you need to modify the MySQL configuration file (my.cnf or my.ini or 50-server.cnf), typically located in /etc/mysql/ or /usr/local/mysql/etc/ or /etc/mysql/mariadb.conf.d.
Look for the following line in the configuration file:
bind-address = 127.0.0.1
And change it to:
bind-address = 0.0.0.0
This allows the MySQL server to listen on all available network interfaces.
2. Grant remote access to MySQL user
By default, MySQL server creates a user root with full administrative privileges, but it only allows access from the local machine. To enable remote access for this user, you need to grant it permission to connect from a remote IP address.
Log in to the MySQL server as root user and execute the following command:
GRANT ALL ON . TO 'root'@'%' IDENTIFIED BY 'yourpassword';
This grants the user root access to all databases and tables from any IP address (%). Replace ‘yourpassword‘ with a secure password of your choice.
3. Restart MySQL server
After modifying the configuration file and granting remote access to the user, you need to restart the MySQL server to apply the changes.
On Ubuntu or Debian, use the following command:
sudo service mysql restart
On CentOS or Fedora, use:
sudo systemctl restart mysqld
4. Open MySQL port on firewall
If you have a firewall running on the MySQL server, you need to open the port that MySQL server is listening on (usually port 3306) to allow incoming connections.
On Ubuntu or Debian, use the following command to open the port:
sudo ufw allow 3306/tcp
On CentOS or Fedora, use:
sudo firewall-cmd --add-port=3306/tcp --permanent
sudo firewall-cmd --reload
Once you have completed these steps, you should be able to connect to the MySQL server remotely using the root user and the password you set in step 2.
However, note that allowing remote access to the MySQL server can pose a security risk if not properly secured.
Therefore, it is recommended to only allow connections from trusted IP addresses and to use a secure password.
First update package list and upgrade your operating system:
sudo apt update && sudo apt upgrade
To install Wireguard use command:
sudo apt install wireguard
Now check if Wireguard installed correct:
sudo modprobe wireguard
If this command dose not show anything, Wireguard installed correct. If You get error like this: modprobe: FATAL: Module wireguard not found in directory /lib/modules/4.19.0-12-686, install this package:
sudo apt install linux-headers-$(uname --kernel-release)
The smartmontools package is generally available in the default repositories of all the major Linux distributions. It contains two utilities useful to check the status of storage with S.M.A.R.T support (Self Monitoring Analysis and Reporting Technology): smartcl and smartd.
The former is the utility we use directly to check S.M.A.R.T attributes, run tests, or perform other actions; the latter is the daemon which can be used to schedule operations in the background.
Tu install smartmontools use command:
sudo apt install smartmontools
Checking if SMART is enabled
Let’s become familiar with the smartctl utility. The first thing we want to check is if S.M.A.R.T support is active on the device. To perform this operation we can run the smartctl utility with the -i option (short for –info):
sudo smartctl -i /dev/sda
If SMART support is disabled we need to enable it:
sudo smartctl -s on /dev/sda
Getting S.M.A.R.T information with smartctl
To get information about hard drive /dev/sda use command:
sudo smartctl -a /dev/sda
Very important parameters to check are, among the others, “Reallocated_Sector_Ct” and “Current_Pending_Sector”. In both cases if the RAW_VALUE is something other than 0, we should be very careful and start to backup data on the hard drive. The Reallocated_Sector_Ct is the count of sectors on the block device which cannot be used correctly.
When such a sector is found it is remapped to one of the available spare sectors of the storage device, and data contained in it is relocated. The Current_Pending_Sector attribute, instead, is the count of bad sectors that are still waiting to be remapped. If you want to know more about the S.M.A.R.T attributes and their meaning, you can begin to take a look at the Wikipedia S.M.A.R.T page.
This error occurs when we remove a node from the cluster.
If the cluster has 2 nodes and the two nodes are mentioned to access the quorum.
After removing a node from the cluster only a single node is active. Thus the quorum permission becomes a read-only state.
To resolve the error we change the node from 2 to 1 in the default configuration.
The sample error looks like:

Cluster not ready – no quorum? (500)
First we login to the Proxmox server.
Then we check the state of the cluster using the command
pvecm status
From the result, we find that the Quorum activity is blocked.
Thus we execute the below command to change the votes from 2 to 1.
pvecm expected 1
After executing the command we will be able to delete the VM.
If the VM gets locked during the process, we unlock the VM using the command
qm unlock
Now if you want, you can delete cluster width this commands:
systemctl stop pve-cluster corosync
pmxcfs -l
rm /etc/corosync/*
rm /etc/pve/corosync.conf
killall pmxcfs
systemctl start pve-cluster
Or you can remove only one node from cluster with this documentation:
https://pve.proxmox.com/wiki/Cluster_Manager#_remove_a_cluster_node
In this lesson we install Arch Linux on encrypted btrfs volume step by step.
1. Show all volumes on hard drive:
ls /dev/sd*
2. Delete all volumes on drive /dev/sda
fdisk /dev/sda
Next write letter (d) -> number of volume and then write changes (w)
3. Create some partitions with command cfdisk:
– First partition: 256M, type: EFI System
– Second partition: 512M
– Third partition: full size of disk

Write changes, type yes and exit from cfdisk.
4. Now let’s create file system and encrypt on our partitions:
mkfs.vfat -n "EFI System" /dev/sda1
mkfs.ext4 -L boot /dev/sda2
mkfs.ext4 -L root /dev/sda3
We successfully created three partitions – efi, boot and root.
Now we need to encrypt our root partition:
modprobe dm-crypt
modprobe dm-mod
cryptsetup luksFormat -v -s 512 -h sha512 /dev/sda3
Type YES in capital letters and password for encrypted partition.

5. Open our encrypted partition:
cryptsetup open /dev/sda3 archlinux
6. Create btrfs partition on our encrypted partition:
mkfs.btrfs -L root /dev/mapper/archlinux
7. Mount
mount -t btrfs /dev/mapper/archlinux /mnt
cd /mnt
8. Create subvolumes for btrfs partition
btrfs subvolume create root
btrfs subvolume create home
btrfs subvolume create snapshots
Go to / and unmount /mnt
cd /
umount -R /mnt
8. Mount
mount -t btrfs -o subvol=root /dev/mapper/archlinux /mnt
Create home and snapshots directories:
mkdir /mnt/home
mkdir /mnt/snapshots
Mount home and snapshots directories
mount -t btrfs -o subvol=home /dev/mapper/archlinux /mnt/home
mount -t btrfs -o subvol=snapshots /dev/mapper/archlinux /mnt/snapshots
Create boot directories:
mkdir /mnt/boot
mkdir /mnt/boot/efi
Show partitions:
lsblk
Mount boot directories:
mount /dev/sda2 /mnt/boot
mount /dev/sda1 /mnt/boot/efi
9. Create swap file:
dd if=/dev/zero of=swap bs=1M count=1024
chmod 0600 swap
mkswap swap
swapon swap
10. Install Arch Linux to /mnt directory:
pacstrap -i /mnt base base-devel efibootmgr grub linux linux-firmware networkmanager vim mc
11. Generate fstab
genfstab -U /mnt > /mnt/etc/fstab
12 Arch chroot to our new system:
arch-chroot /mnt
13. Change root password:
passwd
14. Uncomment locales in /etc/locale.gen file
vim /etc/locale.gen
Generate locale:
locale-gen
echo LANG=en_US > /etc/locale.conf
15. Configure grub boot loader
vim /etc/default/grub
In line GRUB_CMDLINE_LINUX=”” write this text:
GRUB_CMDLINE_LINUX="cryptdevice=/dev/sda3:archlinux"
Change file /etc/mkinitcpio.conf: in line HOOKS add encrypt
HOOKS=(... encrypt ...)
mkinitcpio -p linux
Configure grub bootloader:
grub-install --boot-directory=/boot --efi-directory=/boot/efi /dev/sda2
grub-mkconfig -o /boot/grub/grub.cfg
grub-mkconfig -o /boot/efi/EFI/arch/grub.cfg