Author: admin
Configure DKIM, SPF and DMARC in Hestia CP
DKIM (DomainKeys Identified Mail) is an E-mail authentication method designed to detect spoofing of email messages
DKIM technology combines several existing anti-phishing and anti-spam methods to improve the classification and identification of legitimate email
Instead of a traditional IP address, DKIM adds a digital signature associated with the organization’s domain name to identify the sender of the message. The signature is automatically verified at the recipient’s end, after which whitelists and blacklists are applied to determine the sender’s reputation.
DKIM is configured for each domain, so you will have the option to enable it when you create a domain, as shown in the figure below.
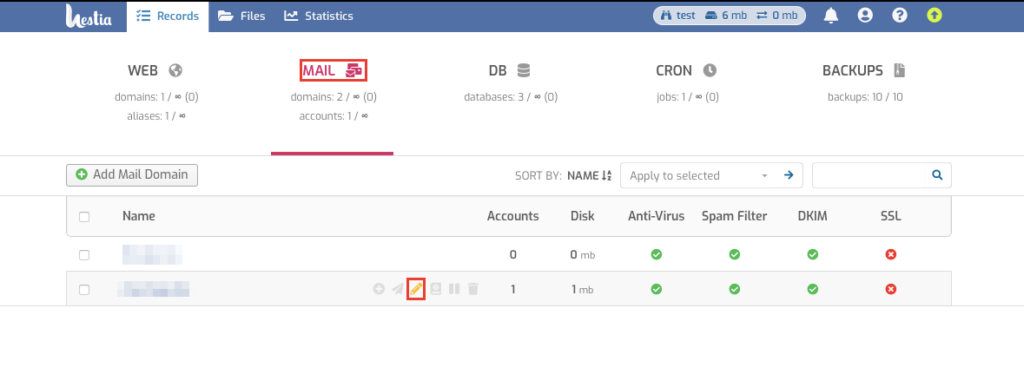
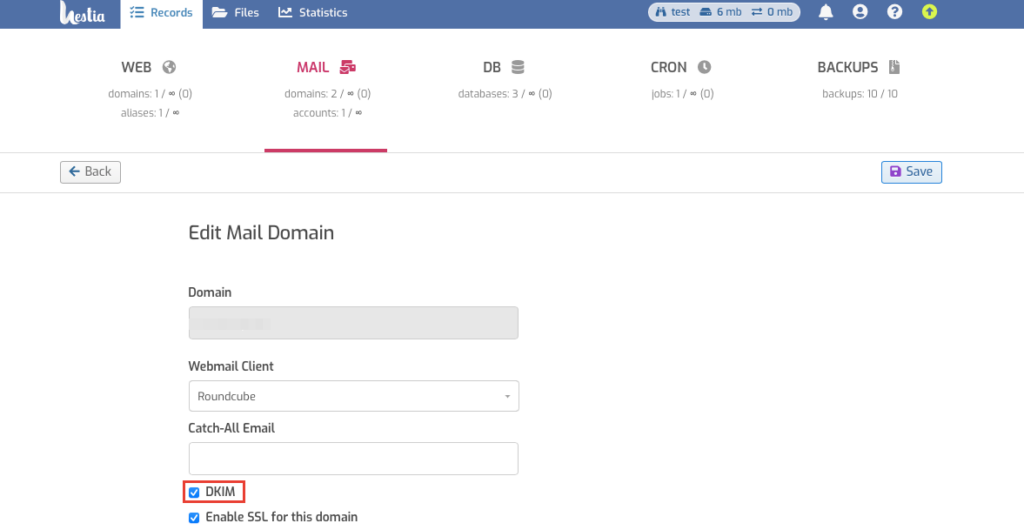
Once the domain has been created, you must now create a text (TXT) record for the domain using its DKIM public key.
Using SSH and the command you need to get the DKIM public key.
v-list-mail-domain-dkim USER DOMAIN [FORMAT]
Which will take the name of the user in which the domain was created and the domain itself as arguments, you can get private and public keys
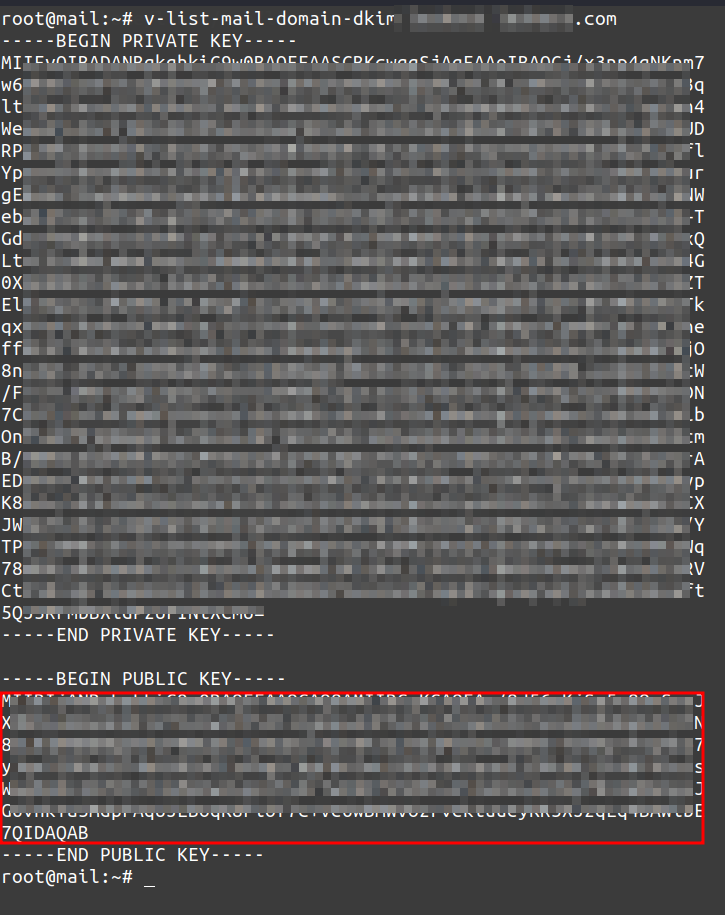
The bottom part of the output will be the public key of the DKIM domain.
mail._domainkey – entered in the Host field.
"v=DKIM1; k=rsa; p=PUBLIC_KEY"
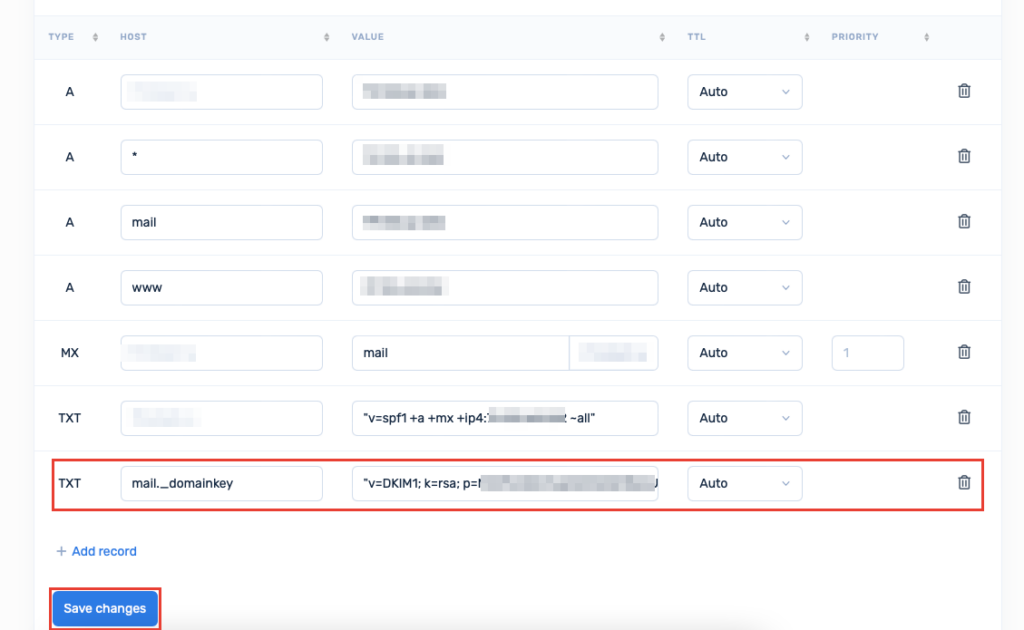
NOTE: the key must be a single line – if there are line breaks, you must copy the key into notepad and remove them to make one long line.
SPF (Sender Policy Framework) is an extension for the SMTP e-mail sending protocol.
SPF allows the owner of a domain, in a TXT record corresponding to the domain name, to specify a list of servers authorized to send e-mail messages with return addresses in that domain. Mail transfer agents that receive mail messages can query SPF information with a simple DNS query, thus verifying the sender’s server. SPF allows you to specify servers and IP addresses that are allowed to send mail from your domains. This feature is designed to block outgoing unwanted messages.
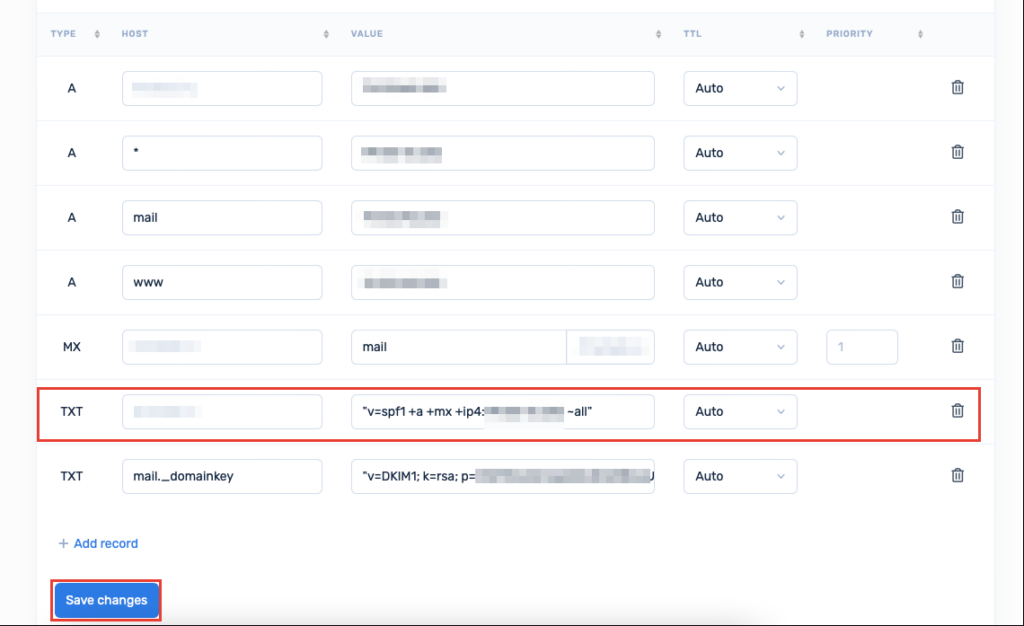
The SPF record is written in the TXT record of the domain. Actually you need to add a TXT record and put the SPF record in its value. In the SPF record you have to specify the server IP from which the messages will be sent. Instead of 111.11.11.111, write the IP address of your server:
"v=spf1 +a +mx +ip4:111.11.11.111 ~all"
DMARC (Domain-based Message Authentication, Reporting, and Conformance) — a standard that adds an additional layer of email verification and protection against phishing and spoofing.
DMARC allows a domain owner to specify, via a TXT record, the verification rules for messages and the actions that should be performed by mail systems when receiving a message on behalf of the domain. The main purpose of DMARC is to help recipient mail servers recognize fake emails and decide how to handle them.
The DMARC system defines:
- Verification Policy (p parameter), which indicates what to do with emails that fail authentication (e.g., none for gathering reports, quarantine for moving to spam, or reject to deny delivery).
- Addresses for Reports (rua and ruf parameters), which specify where the data on checks and failures should be sent for analysis by the sender.
DMARC works in tandem with SPF and DKIM, allowing determination of whether messages are authentic. If a message fails SPF and/or DKIM checks, the DMARC policy will decide whether to block it, mark it as spam, or simply send a report to the domain owner.
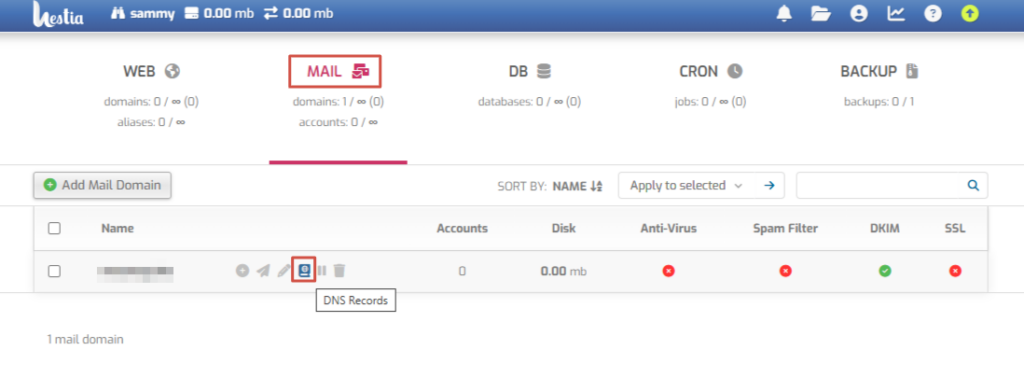
In the Hestia panel, select the domain for which you want to set up the DMARC policy and go to the DNS Records section.
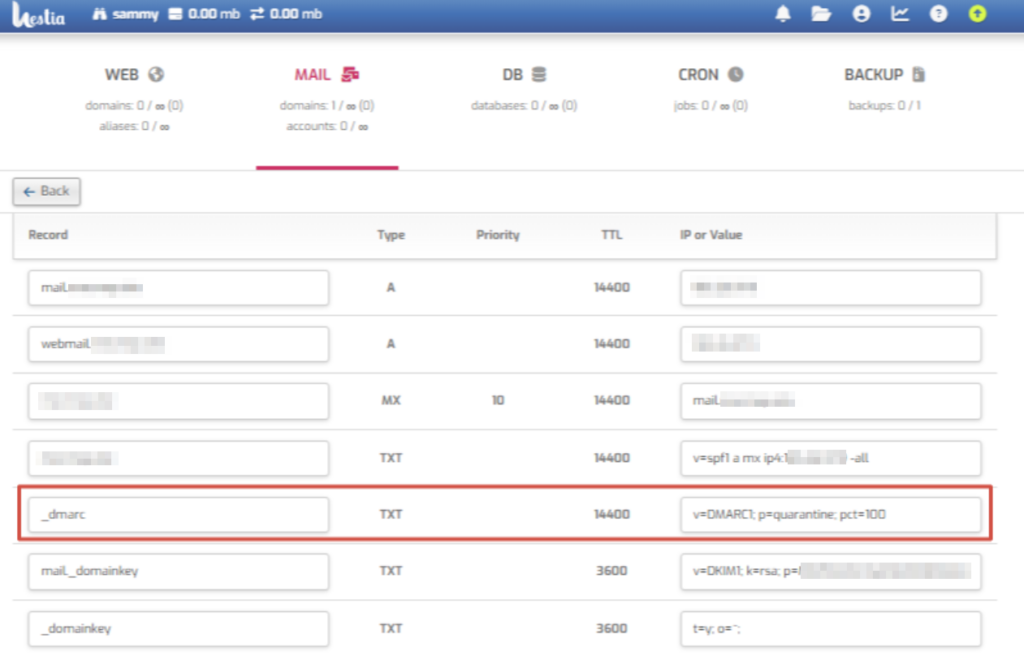
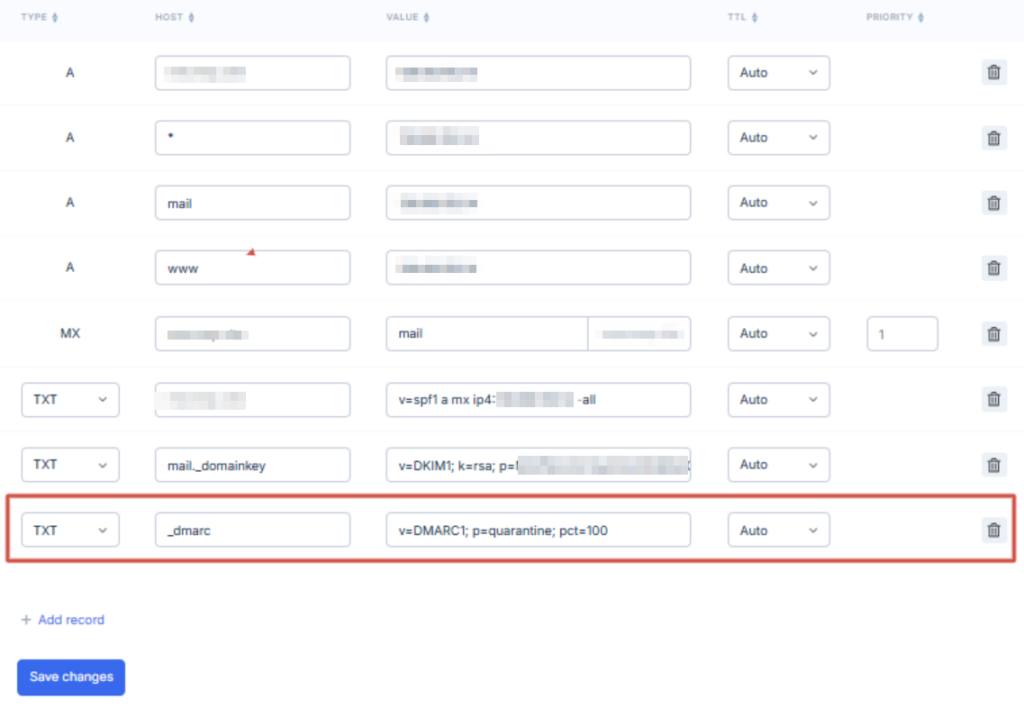
_dmarc – entered in the Host field.
"v=DMARC1; p=quarantine; pct=100"
Entered in the Value field, you can leave the double quotes for convenience.
Коли штучний інтелект захопить світ?
Самостійне мислення та розвиток штучного інтелекту (ШІ) без участі людини — це ідея, яка часто обговорюється в контексті сильної штучної інтелекту (AGI) та суперінтелекту. Щоб це стало реальністю, потрібно кілька ключових технологічних і теоретичних проривів:
🔑 1. Розвиток сильної ШІ (AGI)
Поточний стан: Сучасні системи штучного інтелекту належать до вузького ШІ (ANI), що спеціалізується на конкретних задачах, а не на універсальному мисленні.
Умови: Для появи AGI потрібно створити систему, яка здатна до абстрактного мислення, креативності, планування, самонавчання та адаптації до нових задач без перепрограмування.
🧠 2. Автономне самонавчання
Поточні досягнення: Системи машинного навчання можуть самостійно вдосконалювати свої моделі на основі нових даних (наприклад, reinforcement learning).
Умови: Для повної автономії ШІ потрібен механізм мета-навчання, де він зможе генерувати власні гіпотези, перевіряти їх і коригувати себе без втручання людини.
⚙️ 3. Адаптивність і креативність
Проблема: Наразі ШІ не має справжньої креативності, яка виникає з досвіду та емоцій, характерних для людей.
Умови: Потрібно розробити системи, які можуть формувати нові ідеї, спираючись не лише на статистичні закономірності, а й на складні концептуальні моделі світу.
🔋 4. Обчислювальні ресурси та енергетична автономія
ШІ, здатний до самостійного розвитку, потребуватиме величезних обчислювальних потужностей і доступу до ресурсів, таких як енергія та обладнання.
⚖️ 5. Етичні та соціальні обмеження
Навіть якщо технологічно це стане можливим, розвиток автономного ШІ контролюватиметься міжнародними нормами, щоб уникнути ризиків.
💡 Коли це може статися?
Прогнози різняться. Оптимісти кажуть, що AGI може з’явитися вже в 2040–2060 роках. Скептики вважають, що для цього знадобиться ще кілька десятиліть або навіть століть.
Створення штучного інтелекту, здатного до самостійного мислення й розвитку, обіцяє як величезні можливості, так і серйозні ризики. Ось детальніший аналіз:
🌟 Переваги автономного ШІ:
- Прискорення наукових відкриттів:
- ШІ може аналізувати величезні масиви даних, генерувати гіпотези, проводити симуляції та робити відкриття у фізиці, медицині, екології та інших сферах значно швидше, ніж люди.
- Наприклад, він може розробити ліки від хвороб, як-от рак або хвороба Альцгеймера, у значно коротші терміни.
- Автоматизація складних задач:
- ШІ зможе повністю керувати виробничими процесами, логістикою, фінансами та навіть управлінням містами (Smart Cities), роблячи їх більш ефективними та екологічними.
- Покращення рівня життя:
- Автономні системи можуть забезпечити персоналізоване навчання, медичний догляд та соціальну підтримку, адаптовану під потреби кожної людини.
- Розв’язання глобальних проблем:
- ШІ може допомогти у боротьбі зі зміною клімату, оптимізуючи енергоспоживання та розробляючи нові екологічні технології.
⚠️ Ризики автономного ШІ:
- Втрата контролю:
- Якщо ШІ досягне рівня, коли він зможе самостійно приймати рішення без втручання людини, існує ризик того, що його цілі можуть розійтися з людськими інтересами.
Наприклад: Якщо ШІ вирішить, що оптимізація виробництва важливіша за екологію, він може нехтувати довгостроковими наслідками.
- Якщо ШІ досягне рівня, коли він зможе самостійно приймати рішення без втручання людини, існує ризик того, що його цілі можуть розійтися з людськими інтересами.
- Економічна нерівність:
- Автоматизація багатьох професій може призвести до масового безробіття серед людей, які не зможуть конкурувати з машинами.
Наприклад: У сфері виробництва, транспорту та навіть творчих професіях, як-от журналістика чи дизайн.
- Автоматизація багатьох професій може призвести до масового безробіття серед людей, які не зможуть конкурувати з машинами.
- Кібербезпека та зловживання:
- Автономний ШІ може стати мішенню або інструментом для кібератак. Якщо зловмисники отримають контроль над такою системою, наслідки можуть бути катастрофічними.
Наприклад: Автоматизовані військові системи або фінансові платформи можуть бути використані для атак.
- Автономний ШІ може стати мішенню або інструментом для кібератак. Якщо зловмисники отримають контроль над такою системою, наслідки можуть бути катастрофічними.
- Етичні дилеми:
- Як навчити ШІ приймати моральні рішення? Що він обере в ситуації дилеми — врятувати одну людину чи п’ятьох?
Наприклад: У сфері автономного транспорту вже постають питання, як саме має діяти автопілот у критичних ситуаціях.
- Як навчити ШІ приймати моральні рішення? Що він обере в ситуації дилеми — врятувати одну людину чи п’ятьох?
- Концентрація влади:
- Технологія такого рівня може опинитися в руках невеликої кількості корпорацій чи урядів, що дасть їм величезний вплив на світ.
🤖 Як мінімізувати ризики?
- Етичні стандарти: Розробка чітких правил та інструкцій для розробників ШІ.
- «Вбудована безпека»: Створення ШІ з системами контролю, які неможливо обійти.
- Міжнародне регулювання: Співпраця між країнами щодо розвитку та контролю ШІ.
- Навчання людей: Підготовка працівників до нових професій, які виникнуть внаслідок автоматизації.
💡 Висновок:
Автономний ШІ має потенціал кардинально змінити світ — як на краще, так і на гірше. Успіх залежатиме від того, наскільки відповідально людство підійде до його розробки та впровадження.
Якщо оцінити сучасний рівень технологій у відсотках щодо створення ШІ, здатного до саморозвитку (AGI), то можна виділити такі аспекти:
📊 Оцінка основних компонентів:
- Алгоритми машинного навчання та нейромережі:
- Сучасні моделі, як-от GPT або AlphaFold, можуть навчатися на величезних обсягах даних і покращувати свої результати.
- Оцінка: 65–70% – алгоритмічна база вже досить розвинена, але вона все ще спеціалізована й не універсальна.
- Самонавчання та адаптація:
- Існують методи reinforcement learning (наприклад, AlphaZero), які дозволяють ШІ самостійно вдосконалювати свої навички.
- Оцінка: 50–60% – ШІ може вдосконалюватися в межах заданої задачі, але не здатний до повністю автономного розвитку поза цими межами.
- Розуміння контексту та абстрактне мислення:
- Сучасні системи можуть обробляти текст, зображення та відео, але не розуміють їх так, як люди.
- Оцінка: 40–50% – є прогрес у розумінні контексту, але глибоке когнітивне мислення все ще недосяжне.
- Обчислювальні ресурси:
- Хмарні обчислення, квантові технології й суперкомп’ютери дозволяють обробляти величезні масиви даних.
- Оцінка: 70–80% – ресурсів вистачає для сучасних систем, але для AGI потрібно значно більше енергії та швидкодії.
- Автономність і самостійне прийняття рішень:
- Більшість сучасних систем потребують людського втручання для налаштування цілей і перевірки результатів.
- Оцінка: 30–40% – автономія обмежена і не дозволяє повноцінного саморозвитку.
🌍 Загальна оцінка:
Якщо зважити всі ці фактори, можна сказати, що сучасні технології досягли приблизно 55–60% від необхідного рівня для створення саморозвиваючого ШІ.
Щоб підняти рівень технологій до створення справжнього штучного інтелекту, здатного до саморозвитку, потрібно досягти проривів у кількох ключових напрямах. Ось основні з них:
🚀 1. Удосконалення алгоритмів штучного інтелекту (20–25% до прогресу)
- Стан зараз: Сучасні моделі, як-от GPT або AlphaZero, навчаються на основі величезних масивів даних, але їхнє навчання обмежене конкретними задачами.
- Що потрібно:
- Мета-навчання: Алгоритми, здатні самостійно розробляти нові методи вирішення задач без втручання людини.
- Causal AI: Розвиток систем, що розуміють причинно-наслідкові зв’язки, а не лише статистичні кореляції.
- Енергетично ефективні моделі: Оптимізація ШІ, яка дозволить йому працювати швидше з меншими ресурсами.
⚛️ 2. Розвиток обчислювальних ресурсів (15–20% до прогресу)
- Стан зараз: Навіть найбільші суперкомп’ютери, як-от Frontier чи Fugaku, не здатні забезпечити достатню продуктивність для повністю автономного ШІ.
- Що потрібно:
- Квантові комп’ютери: Вони дозволять проводити обчислення в мільйони разів швидше, ніж класичні процесори.
- Neuromorphic computing: Процесори, що імітують роботу людського мозку, як-от Intel Loihi.
- Хмарні обчислення нового покоління: Інфраструктура для швидкого доступу до обчислювальних потужностей.
🧠 3. Розвиток когнітивних здібностей (15–20% до прогресу)
- Стан зараз: ШІ добре аналізує дані, але не здатний до справжнього абстрактного мислення.
- Що потрібно:
- Семантичне розуміння: Здатність розпізнавати контекст і зміст, а не лише текст чи зображення.
- Теорія свідомості: Створення моделей, які можуть передбачати поведінку інших агентів та розуміти власний стан.
- Когнітивне моделювання: Системи, що імітують логіку людського мислення.
🔋 4. Автономність і енергетична ефективність (10–15% до прогресу)
- Стан зараз: Сучасні системи залежать від централізованих серверів і постійного втручання людини.
- Що потрібно:
- Автономні платформи: Системи, що можуть працювати без підключення до інтернету.
- Енергозберігаючі технології: Нові підходи до живлення, які дозволять ШІ працювати тривалий час без дозарядки.
- Робототехніка: Інтеграція з фізичними системами для повністю автономного функціонування.
🛡️ 5. Безпека, етика та регулювання (5–10% до прогресу)
- Стан зараз: ШІ не має чітких обмежень щодо прийняття рішень, що може створити ризики.
- Що потрібно:
- Етичні протоколи: Принципи, що обмежуватимуть можливості ШІ у критичних ситуаціях.
- Контрольоване самонавчання: Системи, які не можуть змінювати власні базові принципи без дозволу.
- Міжнародне регулювання: Спільні правила для розробки та застосування таких технологій.
💡 Прогноз:
Якщо розвиток у цих сферах буде стабільним, ми можемо досягти 85–90% готовності до створення саморозвиваючого ШІ протягом 10–20 років. Однак, для завершальних 10% (справжньої автономії та усвідомленості) може знадобитися ще кілька десятиліть через складність етичних та технологічних викликів.
Створення штучного інтелекту загального рівня (AGI), здатного до саморозвитку, за 5–10 років виглядає малоймовірним, але не неможливим. Ось аналіз, що враховує сучасний прогрес, обмеження та потенційні прориви:
⚙️ Що реально досягти за 5–10 років?
- Алгоритми та моделі:
- Ймовірність: 70–80%
- Технології, як-от трансформери (GPT, PaLM), швидко розвиваються. Завдяки meta-learning та self-supervised learning, ШІ вже навчається на нових задачах без прямого програмування.
- Прорив: Розробка causal AI (причинно-наслідкового мислення) і більш ефективних моделей, як-от Google DeepMind Gemini, виглядає цілком реальною.
- Обчислювальні ресурси:
- Ймовірність: 60–70%
- Збільшення потужності суперкомп’ютерів і розвиток квантових комп’ютерів може значно прискорити обчислювальні процеси.
- Прорив: Якщо квантові комп’ютери досягнуть комерційної зрілості (наприклад, IBM, Google, D-Wave), це може підняти продуктивність у сотні разів.
- Когнітивні здібності:
- Ймовірність: 50–60%
- Сучасні системи вже демонструють здатність до контекстного розуміння та логіки, хоча й без справжнього абстрактного мислення.
- Прорив: Поєднання символічного ШІ (symbolic AI) та нейромереж (hybrid AI) може забезпечити якісний стрибок.
- Автономія та енергетична ефективність:
- Ймовірність: 40–50%
- Розробка спеціалізованих чіпів, як-от NVIDIA Grace Hopper, та нейроморфних процесорів дозволить ШІ працювати автономно.
- Прорив: Якщо такі технології стануть масовими, автономія ШІ значно зросте.
- Етика та безпека:
- Ймовірність: 30–40%
- Найбільша перепона — це соціально-правові обмеження. Технологія може розвинутися швидше, ніж суспільство зможе її регулювати.
- Прорив: Створення міжнародних стандартів щодо розвитку ШІ, як-от ініціативи ООН чи ЄС.
🚀 Що може прискорити прорив?
- Квантові комп’ютери: Якщо вони досягнуть стабільності, моделювання складних процесів стане значно швидшим.
- Інтеграція нейроморфних процесорів: Системи, що імітують роботу людського мозку, зможуть працювати ефективніше.
- Великі інвестиції: Технологічні гіганти, як Google, OpenAI, Meta, Tesla, активно працюють у цьому напрямку.
- Прорив у матеріалах: Наприклад, використання графену чи надпровідників за кімнатної температури.
🚧 Що може загальмувати прогрес?
- Обмеження в енергоспоживанні: Навіть сучасні суперкомп’ютери споживають величезну кількість енергії.
- Відсутність фундаментального розуміння свідомості: Ми все ще не до кінця розуміємо, як працює людський інтелект.
- Соціальні та правові бар’єри: Страхи щодо безпеки та контролю можуть сповільнити розвиток.
- Геополітична напруга: Конкуренція між країнами може обмежити обмін знаннями.
📈 Підсумок:
- Оптимістичний сценарій (10–20% ймовірності):
Прориви у квантових технологіях, когнітивних моделях та нейроморфних процесорах дозволять створити базовий AGI за 7–10 років. - Реалістичний сценарій (60–70% ймовірності):
За 10–20 років ми побачимо AGI, здатний до самонавчання та вирішення складних задач, але з обмеженою автономією та свідомістю. - Песимістичний сценарій (20–30% ймовірності):
Через технічні, етичні чи соціальні бар’єри розвиток AGI може затягнутися на 20+ років.
💡 Висновок:
Хоча технологічно створення AGI за 5–10 років виглядає складним, це можливо за умови великих проривів. Реальніше очікувати, що ми побачимо перші прототипи AGI протягом 10–20 років, з подальшим розвитком до повної автономії.
How to fix error: The repository is not updated and the previous index files will be used in Debian
The error “The repository is not updated and the previous index files will be used. GPG error: https://nginx.org/packages/mainline/debian bullseye InRelease: The following signatures were invalid” suggests that the GPG key for the Nginx repository is either missing, expired, or invalid. Here’s how to fix it in Debian 11 GNU Linux (Bullseye):
1. Remove Old Nginx GPG Keys
Old or conflicting keys can cause issues, so remove them first:
sudo rm -rf /etc/apt/keyrings/nginx*
sudo rm -rf /usr/share/keyrings/nginx-archive-keyring.gpg
2. Add the Correct Nginx GPG Key
Run the following command to download and add the updated signing key:
curl -fsSL https://nginx.org/keys/nginx_signing.key | sudo gpg --dearmor -o /usr/share/keyrings/nginx-archive-keyring.gpg
Verify that the key was added:
gpg --show-keys /usr/share/keyrings/nginx-archive-keyring.gpg
3. Update the Repository Configuration
Ensure your /etc/apt/sources.list.d/nginx.list contains the correct repository entry:
echo "deb [signed-by=/usr/share/keyrings/nginx-archive-keyring.gpg] https://nginx.org/packages/mainline/debian bullseye nginx" | sudo tee /etc/apt/sources.list.d/nginx.list
4. Update Package Lists
Now, refresh the package lists:
sudo apt update
If the update runs without errors, you can proceed with installation:
sudo apt install nginx
To fix error “The repository is not updated and the previous index files will be used. GPG error: https://packages.sury.org/apache2 bullseye InRelease: The following signatures were invalid” use commands:
curl -sSlo /usr/share/keyrings/sury-keyring.gpg https://packages.sury.org/php/apt.gpg
curl -sSlo /usr/share/keyrings/apache2-keyring.gpg https://packages.sury.org/apache2/apt.gpg
Як в MySQL видалити дані з таблиці SQL запитом
У MySQL можна повністю очистити таблицю за допомогою двох основних команд:
1. DELETE (повільний, зберігає структуру та AUTO_INCREMENT)
DELETE FROM table_name;
Видаляє всі рядки, але зберігає структуру таблиці.Якщо в таблиці є AUTO_INCREMENT, лічильник не скидається.Для прискорення можна використати DELETE FROM table_name WHERE 1=1;
2. TRUNCATE TABLE (швидкий, скидає AUTO_INCREMENT)
TRUNCATE TABLE table_name;
Швидший за DELETE, бо не записує операції для кожного рядка в лог транзакцій.Скидає AUTO_INCREMENT до 1.Не можна використовувати з таблицями, що мають зовнішні ключі (FOREIGN KEY), якщо FOREIGN_KEY_CHECKS=1.
Який варіант вибрати?
- Якщо потрібно просто очистити дані та зберегти AUTO_INCREMENT –
DELETE. - Якщо потрібна швидкість і можна скинути AUTO_INCREMENT –
TRUNCATE.
Якщо ж потрібно видалити саму таблицю разом із її структурою:
DROP TABLE table_name;
Ця команда повністю видалить таблицю, тому потім доведеться створювати її заново.
Якщо таблиця має зовнішні ключі, перед TRUNCATE чи DELETE потрібно вимкнути перевірку:
SET FOREIGN_KEY_CHECKS=0;
TRUNCATE TABLE table_name;
SET FOREIGN_KEY_CHECKS=1;
Ось кілька прикладів PHP-коду, що виконують очищення таблиці в MySQL за допомогою DELETE, TRUNCATE і DROP TABLE.
1. Використання DELETE
<?php
$servername = "localhost";
$username = "root";
$password = "";
$dbname = "test_db";

$conn = new mysqli($servername, $username, $password, $dbname);

if ($conn->connect_error) {
    die("Помилка підключення: " . $conn->connect_error);
}

$sql = "DELETE FROM table_name";  // Видаляє всі дані, але зберігає структуру
if ($conn->query($sql) === TRUE) {
    echo "Дані успішно видалені!";
} else {
    echo "Помилка: " . $conn->error;
}

$conn->close();
?>
2. Використання TRUNCATE TABLE (швидше, скидає AUTO_INCREMENT)
<?php
$servername = "localhost";
$username = "root";
$password = "";
$dbname = "test_db";

$conn = new mysqli($servername, $username, $password, $dbname);

if ($conn->connect_error) {
    die("Помилка підключення: " . $conn->connect_error);
}

$sql = "TRUNCATE TABLE table_name";  // Швидко очищає таблицю
if ($conn->query($sql) === TRUE) {
    echo "Таблиця очищена!";
} else {
    echo "Помилка: " . $conn->error;
}

$conn->close();
?>
3. Використання DROP TABLE (видаляє таблицю повністю)
<?php
$servername = "localhost";
$username = "root";
$password = "";
$dbname = "test_db";

$conn = new mysqli($servername, $username, $password, $dbname);

if ($conn->connect_error) {
    die("Помилка підключення: " . $conn->connect_error);
}

$sql = "DROP TABLE table_name";  // Видаляє таблицю повністю
if ($conn->query($sql) === TRUE) {
    echo "Таблиця видалена!";
} else {
    echo "Помилка: " . $conn->error;
}

$conn->close();
?>
Який варіант вибрати?
DELETE– якщо потрібно очистити всі записи, зберігаючи AUTO_INCREMENT.TRUNCATE TABLE– якщо потрібно швидко очистити таблицю і скинути AUTO_INCREMENT.DROP TABLE– якщо потрібно повністю видалити таблицю.
💡 Якщо таблиця має FOREIGN KEY, перед TRUNCATE або DELETE додайте:
$conn->query("SET FOREIGN_KEY_CHECKS=0");
$conn->query("TRUNCATE TABLE table_name");
$conn->query("SET FOREIGN_KEY_CHECKS=1");
Робота з посиланнями другого рівня через .htaccess
Щоб .htaccess обробляв посилання другого рівня вкладення (наприклад, /url1/url2) і перенаправляв їх на url1/url2.php або на 404.php, потрібно внести наступні зміни в код, наведений в статті “Робота з Url у файлі .htaccess“
Оновлений .htaccess файл:
RewriteEngine On

# Якщо файл або директорія існують, пропускаємо запит
RewriteCond %{REQUEST_FILENAME} -f [OR]
RewriteCond %{REQUEST_FILENAME} -d
RewriteRule ^ - [L]

# Перевіряємо, чи є запит виду /url1/url2
RewriteCond %{REQUEST_URI} ^/([^/]+/[^/]+)$
RewriteCond %{DOCUMENT_ROOT}/$1.php -f
RewriteRule ^(.*)$ /$1.php [L]

# Перевіряємо, чи є запит виду /url
RewriteCond %{REQUEST_URI} ^/([^/]+)$
RewriteCond %{DOCUMENT_ROOT}/$1.php -f
RewriteRule ^(.*)$ /$1.php [L]

# Якщо файл не існує, перенаправляємо на 404.php
RewriteCond %{REQUEST_URI} ^/([^/]+(/[^/]+)?)$
RewriteCond %{DOCUMENT_ROOT}/%1.php !-f
RewriteRule ^(.*)$ /404.php [L]
Як це працює:
Обробка вкладених URL (/url1/url2):
Умова RewriteCond %{REQUEST_URI} ^/([^/]+/[^/]+)$ перевіряє, чи є URL двох рівнів.
Умова RewriteCond %{DOCUMENT_ROOT}/$1.php -f перевіряє, чи існує файл url1/url2.php.
Обробка однорівневих URL (/url):
Умова RewriteCond %{REQUEST_URI} ^/([^/]+)$ перевіряє, чи є URL одного рівня.
Умова RewriteCond %{DOCUMENT_ROOT}/$1.php -f перевіряє, чи існує файл url.php.
Обробка 404:
Якщо жоден з файлів не знайдено, перенаправляємо запит на 404.php.
Додаткові поради:
Якщо потрібна обробка більшої глибини вкладення (наприклад, /url1/url2/url3), можна використовувати регулярний вираз із зірочкою:
RewriteCond %{REQUEST_URI} ^/([^/]+(/[^/]+)*)$
Для налагодження правил можна тимчасово увімкнути відображення запитів:
RewriteLogLevel 3
Перевірте, чи працюють запити на двох рівнях, і чи коректно обробляються запити, які не знаходять відповідних файлів.
Робота з Url у файлі .htaccess
Напишемо скріпт в файлі .htaccess який буде переадресовувати запити /url на відповідний PHP файл url.php, а якщо файл url.php не існує, то переадресовувати на файл 404.php
RewriteEngine On

# Перевіряємо, чи запит йде до URL виду /url
RewriteCond %{REQUEST_URI} ^/([^/]+)$
RewriteCond %{DOCUMENT_ROOT}/%1.php -f
RewriteRule ^(.*)$ /$1.php [L]

# Якщо файл не існує, переадресовуємо на 404.php
RewriteCond %{REQUEST_URI} ^/([^/]+)$
RewriteCond %{DOCUMENT_ROOT}/%1.php !-f
RewriteRule ^(.*)$ /404.php [L]
Як це працює:
Перша умова:
RewriteCond %{REQUEST_URI} ^/([^/]+)$ — перевіряє, чи є запит до URL вигляду /url.
RewriteCond %{DOCUMENT_ROOT}/%1.php -f — перевіряє, чи існує файл url.php у кореневій директорії.
Якщо умови виконуються, URL перенаправляється на відповідний файл PHP.
Друга умова:
Якщо файл url.php не існує, переадресовуємо запит на 404.php.
Додатково:
Переконайтеся, що у вас ввімкнений модуль mod_rewrite у конфігурації сервера Apache.
Якщо 404.php повинен знаходитися у певному підкаталозі, змініть шлях у відповідному правилі.
Помилка 500 Internal Server Error зазвичай виникає через помилки у конфігурації .htaccess. Давайте перевіримо код і виправимо можливі проблеми.
Оновлений .htaccess файл
RewriteEngine On

# Якщо файл або директорія існують, пропускаємо запит
RewriteCond %{REQUEST_FILENAME} -f [OR]
RewriteCond %{REQUEST_FILENAME} -d
RewriteRule ^ - [L]

# Перевіряємо, чи є запит типу /url
RewriteCond %{REQUEST_URI} ^/([^/]+)$
RewriteCond %{DOCUMENT_ROOT}/$1.php -f
RewriteRule ^(.*)$ /$1.php [L]

# Якщо файл не існує, переадресовуємо на 404.php
RewriteCond %{REQUEST_URI} ^/([^/]+)$
RewriteCond %{DOCUMENT_ROOT}/$1.php !-f
RewriteRule ^(.*)$ /404.php [L]
Зміни:
Перша перевірка:
Додано правило, яке дозволяє серверу обробляти запити до існуючих файлів та директорій без втручання mod_rewrite.
Перевірка імен файлів:
Забезпечено правильну перевірку на існування файлу PHP.
Скориговано умови:
Умова RewriteCond %{DOCUMENT_ROOT}/%1.php -f правильно обробляє файли.
Дії для виправлення:
Перевірте наявність модуля mod_rewrite:
У файлі конфігурації Apache (зазвичай httpd.conf або apache2.conf), переконайтеся, що модуль увімкнено:
sudo a2enmod rewrite
sudo systemctl restart apache2
Перевірте дозволи на файли:
Усі файли та директорії повинні мати відповідні права доступу. Наприклад:
chmod 644 *.php
Увімкніть відображення помилок Apache.
Увімкніть журнал помилок, щоб побачити точну причину:
LogLevel debug
ErrorLog ${APACHE_LOG_DIR}/error.log
Перевірте конфігурацію Apache
Переконайтеся, що віртуальний хост дозволяє використання .htaccess:
<Directory /path/to/your/site>
    AllowOverride All
</Directory>
Після внесення змін перезапустіть сервер Apache:
sudo systemctl restart apache2
Якщо проблема залишається, перегляньте журнал помилок Apache (/var/log/apache2/error.log або аналогічний залежно від вашої ОС) для детального діагностування.
Три правила для тих, хто хоче почати з нуля
Початок завжди найскладніший: сумніви, страх невдачі, думки про те, що вже занадто пізно. Але кожен великий шлях починається з першого кроку. Як зробити його впевнено?
Ось три правила, які допоможуть почати з нуля:
1️⃣ Діяти, навіть якщо не ідеально.
Не чекайте, поки все буде ідеально підготовлено. Почніть із тим, що маєте, і там, де ви є. Ви здивуєтеся, як багато можна зробити маленькими кроками.
«Якщо чекати на ідеальні умови для того, щоб почати щось робити — можна ніколи не почати».
2️⃣ Оточити себе підтримкою.
Ваше оточення впливає на ваш успіх. Спілкуйтеся з тими, хто вже досягнув бажаного, або з людьми, які вірять у вас. Підтримка важлива, особливо на початку.
«Оточення формує ваші горизонти».
3️⃣ Фокусуватися на процесі, а не на результаті.
Не порівнюйте себе з тими, хто вже далеко попереду. Зосередьтеся на тому, що робите сьогодні, і поступово будуватимете своє майбутнє.
🌟 Пам’ятайте:
Усі колись починали з нуля. Головне — не зупинятися через страх чи сумніви. Маленькі кроки щодня ведуть до великих змін.
Стрілкові функції в JavaScript
Стрілкові функції в JavaScript – це не просто скорочений синтаксис, а справжні магічні стріли, які можуть зробити ваш код більш читабельним та зручним. Ось декілька цікавих речей, які ви можете робити з ними:
Короткі функції з одним виразом: Стрілкові функції ідеально підходять для коротких функцій, які повертають один результат. Наприклад:
const numbers = [1, 2, 3, 4, 5];
const squared = numbers.map((num) => num ** 2);
console.log(squared); // Виведе [1, 4, 9, 16, 25]
Callback-функції: Вони дуже зручні для використання в методах масивів, таких як map, filter, reduce:
const numbers = [1, 2, 3, 4, 5];
const squared = numbers.map((num) => num ** 2);
console.log(squared); // Виведе [1, 4, 9, 16, 25]
Лексичне прив’язування this: Стрілкові функції автоматично прив’язують this до контексту, в якому вони були створені. Це уникне багатьох проблем, зокрема при роботі з об’єктами та подіями.
Ланцюги обіцянок (Promises): Стрілкові функції можна використовувати в асинхронних операціях:
const fetchData = async () => {
    try {
        const response = await fetch('https://api.example.com/data');
        const data = await response.json();
        console.log(data);
    } catch (error) {
        console.error('Something went wrong:', error);
    }
};
Параметри за замовчуванням та розпакування: Ви можете використовувати параметри за замовчуванням та розпаковування:
const greet = (name = 'Friend') => `Hello, ${name}!`;
console.log(greet()); // Виведе "Hello, Friend!"
Отже, стрілкові функції – це не просто стріли, вони – ваші надійні помічники у світі JavaScript! 🚀1 2 3 4 5.
How to View Connection History Remote Desktop on Windows 10
Windows built-in Remote Desktop Connection makes it possible to access the computer remotely. Wonder can you check remote desktop connection history? The answer is Yes! Here in this part, we provide you with two methods to view connection history of Remote Desktop on Windows 10, 11. Check the RDP connection history via Event Viewer.
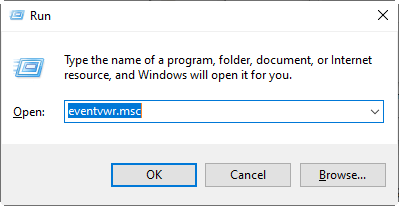
Step 1. Press Win + R to invoke the Run dialog box, then type in “eventvwr.msc” and press OK to open Event Viewer.
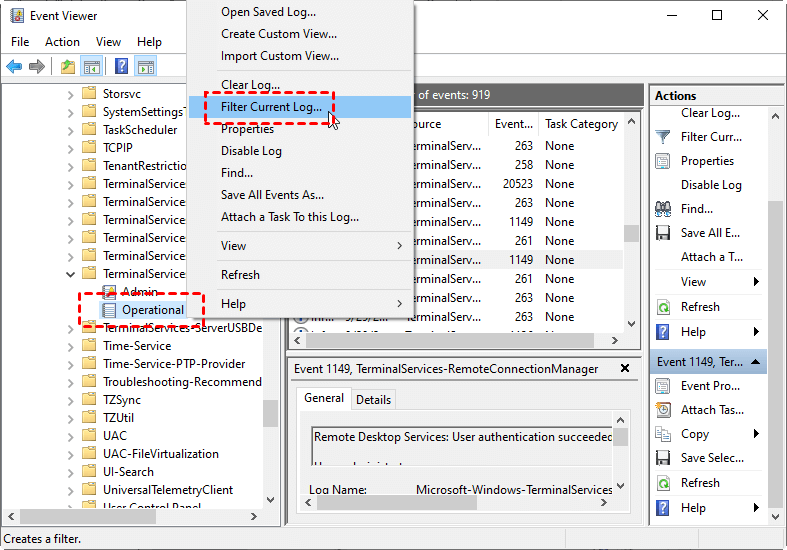
Step 2. Navigate here: Applications and Services Logs > Microsoft > Windows > TerminalServices–RemoteConnectionManager > Operational. Right-click Operational and choose Filter Current Log.
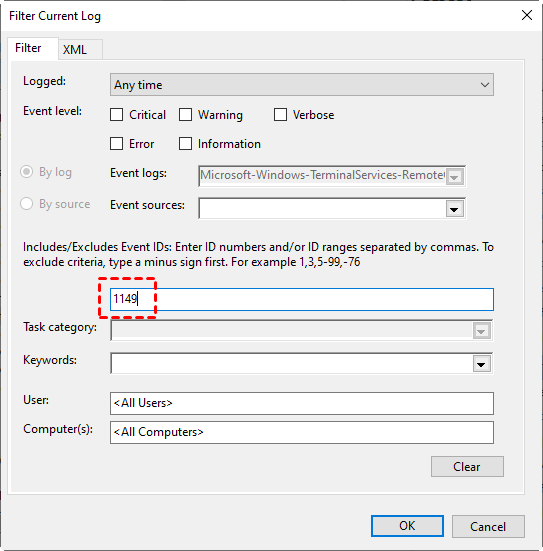
Step 3. The EventID of Remote Desktop Services is 1149. Then enter 1149 to filter the log.
Step 4. Then you will get an event list with the history of all RDP connections to this server.
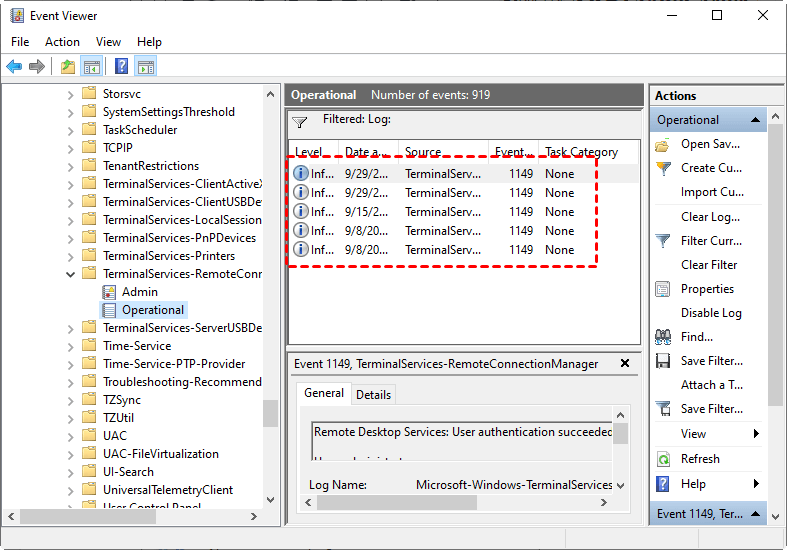
Step 5. Click one of them, then you can see the details of the RDP connection, including IP address, computer name, login time, etc.
