Install Gitea Git Service on Ubuntu 18.04

Gitea is a free, open source and self-hosted version control system alternative to GitHub and GitLab. It is simple, easy, robuts, scalable and a great alternative to other git services. All source code is available under the MIT License on GitHub. Gitea has low minimal requirements (1 CPU core and 1GB RAM), so it can run on an inexpensive Raspberry Pi.

You can also compile Gitea for Windows, macOS, Linux, ARM, etc. Gitea provides lots of features such as, Low resource usage, Multiple database support, free and open source, Multiple OS support, etc.

In this tutorial, we will learn how to install and configure Gitea Git Service on Ubuntu 18.04 server.

Official git repository of Gitea: https://github.com/go-gitea/gitea/

First of all install Ubuntu 18.04. on Your virtual or physical server. After that update and upgrade your system to latest version:

sudo apt-get update
sudo apt-get upgrade

First, you will need to download the latest version of Gitea binary from Git repository. All versions of Gitea You can see here: https://github.com/go-gitea/gitea/releases/. You can download it with the following command:

wget https://github.com/go-gitea/gitea/releases/download/v1.10.3/gitea-1.10.3-linux-amd64

Next, copy the downloaded file to /usr/local/bin/ directory and give necessary permissions:

cp gitea-1.10.3-linux-amd64 /usr/local/bin/gitea
chmod 755 /usr/local/bin/gitea

Next, create a system user for Gitea with the following command:

adduser --system --shell /bin/bash --group  --disabled-password --home /home/gitea gitea

Next, create a directory structure for Gitea with the following command:

mkdir -p /etc/gitea /var/lib/gitea/{custom,data,indexers,public,log}
chown gitea:gitea /etc/gitea /var/lib/gitea/{custom,data,indexers,public,log}
chmod 750 /var/lib/gitea/{data,indexers,log}
chmod 770 /etc/gitea

Create Systemd Service file for Gitea

Next, you will need to create a systemd service file to manage Gitea service. You can create it with the following command:

nano /etc/systemd/system/gitea.service

Add the following lines:

[Unit]
Description=Gitea
After=syslog.target
After=network.target
After=mysql.service

[Service]
RestartSec=2s
Type=simple
User=root
Group=root
WorkingDirectory=/var/lib/gitea/
ExecStart=/usr/local/bin/gitea web -c /etc/gitea/app.ini
Restart=always
Environment=USER=root HOME=/home/git GITEA_WORK_DIR=/var/lib/gitea

[Install]
WantedBy=multi-user.target

Save and close the file. Then, reload systemd and start Gitea service with the following command:

systemctl start gitea

You can check the status of Gitea service with the following command:

systemctl status gitea

Next, enable Gitea service to start at boot time with the following command:

systemctl enable gitea

Gitlab – create and restore backup

To create backup enter command:

sudo gitlab-rake gitlab:backup:create

First we need to make sure that the backup tar file is in the backup directory described in the gitlab.rb configuration (Default is /var/opt/gitlab/backups). Next, we need gitlab running for restoring backup on ominbus installations. If it’s not up, start with,

sudo gitlab-ctl start

and we need to have services that are connected to database in stopped state,

sudo gitlab-ctl stop unicorn
sudo gitlab-ctl stop sidekiq

Copy files from backup folder (/var/opt/gitlab/backups) to external hard drive, also copy files:

/etc/gitlab/gitlab-secrets.json
/etc/gitlab/gitlab.rb

Now execute the following command to restore the backup on server,

sudo gitlab-rake gitlab:backup:restore BACKUP=1393157476_2018_03_11_9.1.0

here, 1393157476_2018_03_11_9.1.0 is the name of the backup file that will be restored. Once the backup has been restored, we need to restart the gitlab services,

sudo gitlab-ctl restart

We now have successfully restored gitlab from the backup file.

Windows – як встановити Git

Щоб встановити Git на Windows 7 завантажте найновішу версію програми на офіційному сайті:

https://git-scm.com/download/win

Запустіть завантажений файл, та слідуйте інструкціям

Якщо ви використовуєте в роботі Visual Studio Code, виберіть його редактором по замовчуванню в списку:

Gitlab – add SSH key

Щоб кожен раз при завантаженні проектів на сервер gitlab не вводити пароль, потрібно добавити SSH ключ.

Для цього на вашому комп’ютері згенеруйте пару відкритого і закритого ключа командою:

ssh-keygen -t rsa -f ~/.ssh/gitlab

Вводити пароль на сертифікат чи ні, вирішуйте самі. Все залежить від ситуації і вашої параноїдальності. Якщо вкажете пароля, його потрібно буде вводити кожен раз, коли будете використовувати ключ для авторизації.

Якщо у вас це єдиний ключ в директорії .ssh, то більше нічого робити не треба. У разі, якщо у вас їх декілька, то треба створити конфігураційний файл і вказати, для якого ресурсу який ключ використовувати. Для цього створюємо файл ~ / .ssh / config приблизно такого змісту:

Host git.example.host
    IdentityFile /home/user/.ssh/gitlab
    port 22

Порт 22 вказувати не обов’язково. Я його вказав для прикладу, щоб в разі використання нестандартного порту, ви його там вказали.

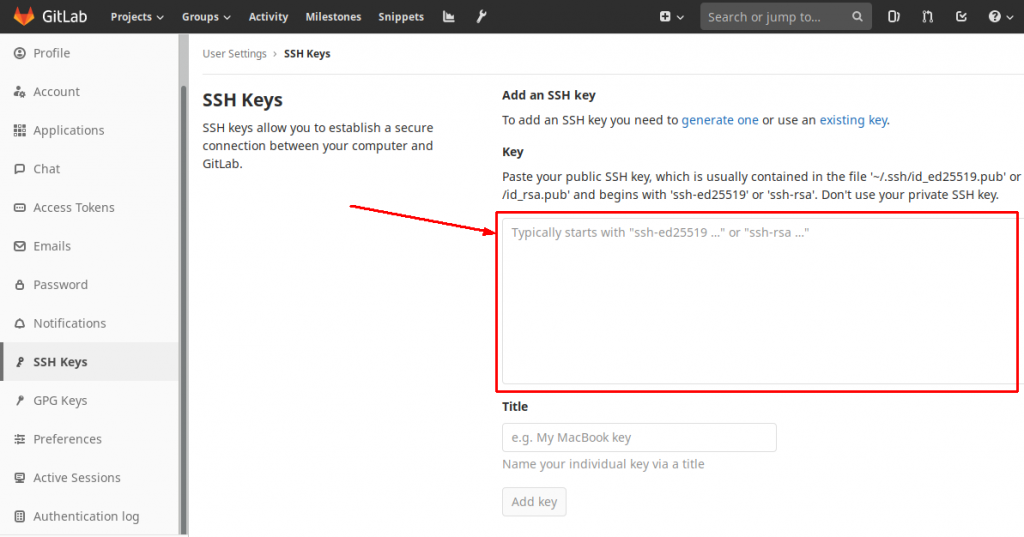
Тепер копіюємо вміст файлу ~/.ssh/gitlab.pub і йдемо в web інтерфейс gitlab. Відкриваємо розділ Setting->SSH Keys і вставляємо в поле key наш ключ.

Щоб завантажити проект на сервер gitlab, відкрийте папку з проектом на вашому комп’ютері та виконайте команди:

git init
git add .
git commit -m "Initial commit"
git remote add project [email protected]:root/project.git
git push

Не забудьте поміняти [email protected] на адрес вашого сервера, розташування та назву проекта root/project.git, на вашому сервері.

Gitlab Nginx add new domain

Щоб добавити додаткові домени на сервер Nginx, на якому працює Gitlab, потрібно відредагувати файл:

nano /etc/gitlab/gitlab.rb

і перейдіть до рядка nginx[‘custom_nginx_config’] та змініть його, як показано нижче, переконайтесь, що рядок не закоментований:

nginx['custom_nginx_config'] = "include /etc/nginx/conf.d/*.conf;"

Створіть новий каталог для конфігураційних файлів Nginx:

mkdir -p /etc/nginx/conf.d/
nano /etc/nginx/conf.d/example.site.conf

Відредагуйте файл example.site.conf

server {
    listen *:80;
    server_name example.site www.example.site;

    return https://$host$request_uri;
}

server {
    listen *:443;
    server_name  example.site www.example.site;

    ssl on;
    ssl_certificate  /etc/letsencrypt/live/example.site/fullchain.pem;
    ssl_certificate_key  /etc/letsencrypt/live/example.site/privkey.pem;

    location / {
        proxy_pass http://127.0.0.1:8080;
        proxy_set_header Host $host;
        proxy_set_header X-Real-IP $remote_addr;
        proxy_set_header X-Forwarded-For $proxy_add_x_forwarded_for;
        proxy_set_header X-Forwarded-Proto https;
    }
}

Встановіть Letsencrypt (якщо ще не встановлений) та додайте сертифікат Letsencrypt для нового домену

sudo apt-get install letsencrypt -y
sudo letsencrypt certonly --standalone --agree-tos --no-eff-email --agree-tos --email [email protected] -d example.site

Gitlab – add project

Задайте глобальні налаштування Git

git config --global user.name "Ivan Ivanov"
git config --global user.email "[email protected]"

Створити новий репозиторій

git clone https://git.example.site/category/project.git
cd project
touch README.md
git add README.md
git commit -m "add README"
git push -u origin master

Завантажити поточну папку в репозиторій

cd existing_folder
git init
git remote add origin https://git.example.site/category/project.git
git add .
git commit -m "Initial commit"
git push -u origin master

Завантажити існуючий Git репозиторій

cd existing_repo
git remote rename origin old-origin
git remote add origin https://git.example.site/category/project.git
git push -u origin --all
git push -u origin --tags

Gitlab install on Ubuntu 18.04

Інструкція по встановленню Gitlab на Ubuntu 18.04
Обновляємо систему:

sudo apt-get update -y
sudo apt-get upgrade -y

Нам потрібно буде встановити SSL, тому зразу встановлюємо всі необхідні залежності:

sudo apt-get install ca-certificates postfix curl openssh-server wget

Тепер завантажуємо скріпт встановлення з офіційного репозиторія Gitlab:

curl -sS https://packages.gitlab.com/install/repositories/gitlab/gitlab-ce/script.deb.sh | sudo bash

Ця команда скачає Gitlab, після чого нам потрібно буде його налаштувати. Нам потрібно поміняти наш URL в файлі:

sudo vim /etc/gitlab/gitlab.rb

Прописуємо наш домен в рядок:

external_url 'http://git.example.site'

Тепер приступимо до налаштування SSL. Взагалі візьміть за правило встановлювати SSL на всі сервіси, які у вас є. Тим більше, що зробити це можна безкоштовно.

Нам потрібно просто встановити LetsEnctypt

sudo apt-get install letsencrypt -y

Після установки нам потрібно вказати EMail і URL

sudo letsencrypt certonly --standalone --agree-tos --no-eff-email --agree-tos --email [email protected] -d git.example.site

Далі нам потрібно створити ключ

sudo mkdir -p /etc/gitlab/ssl/
sudo openssl dhparam -out /etc/gitlab/ssl/dhparams.pem 2048

Міняємо права доступу на цю директорію

chmod 600 /etc/gitlab/ssl/*

Готово.

Тепер, щоб активувати HTTPS, потрібно відредагувати файл

sudo vim /etc/gitlab/gitlab.rb

Міняємо рядок “external_url”

external_url 'https://git.example.site'

Далі в цьому ж файлі шукаємо блок, в якому конфігуруєтся NGINX. В кінці цього блоку вставляємо код:

nginx['redirect_http_to_https'] = true
nginx['ssl_certificate'] = "/etc/letsencrypt/live/git.example.site/fullchain.pem"
nginx['ssl_certificate_key'] = "/etc/letsencrypt/live/git.example.site/privkey.pem"
nginx['ssl_dhparam'] = "/etc/gitlab/ssl/dhparams.pem"

Не забудьте поміняти домен git.example.site на ваш.

Тепер нам потрібно знову сконфігурувати Gitlab

sudo gitlab-ctl reconfigure

Готово.

Тепер нам потрібно включити вбудований в Ubuntu фаєрвол і дозволити підключення до сервера по протоколах ssh, http, https

sudo ufw allow ssh
sudo ufw allow http
sudo ufw allow https

Тепер запустимо сервіс

sudo ufw enable

і перевіримо що він працює

sudo ufw status

У нас повинен успішно запуститися наш GitLab. Перевіряємо його за адресою https://git.example.site

Нас відразу ж попросять придумати пароль. Задаємо пароль, а потім заходимо в GitLab з користувачем root і паролем, який ми тільки що вказали.