In today’s digital world, ensuring the confidentiality of your sensitive data is more important than ever. Whether you’re backing up documents, transferring files, or protecting personal information, encrypting your files is a critical security step. In this article, we’ll explore how to securely encrypt and decrypt any file using the Linux terminal — leveraging robust, open-source tools like gpg and openssl.
🔧 Symmetric Encryption with gpg
The simplest and most effective method for encrypting files locally is symmetric encryption, where the same password is used for both encryption and decryption.
🔒 Encrypt a File with a Password
gpg -c myfile.txt
You’ll be prompted to enter a passphrase. The resulting file will be myfile.txt.gpg.
🔓 Decrypt the File
gpg -o myfile_decrypted.txt -d myfile.txt.gpg
You’ll be prompted for the same passphrase to decrypt the file.
✅ Best For: Local file protection or sharing with someone you trust enough to share a password with.
🔐 Asymmetric Encryption (Using Key Pairs)
For secure communication or file exchange between users, asymmetric encryption is recommended. This method uses a pair of keys: a public key for encryption and a private key for decryption.
Step 1: Generate a Key Pair
gpg --full-generate-key
Choose:
Key type: RSA and RSA
Key size: 4096 bits (recommended)
Expiration: Set if desired
User information: Name and email
Step 2: List Available Keys
gpg --list-keys
Step 3: Encrypt a File for a Specific User
gpg -e -r "User Name or Email" myfile.txt
This command will create myfile.txt.gpg, encrypted with the recipient’s public key.
Step 4: Decrypt the File
gpg -d myfile.txt.gpg > myfile_decrypted.txt
The recipient’s private key must be available on the system to decrypt.
✅ Best For: Secure communication and file exchange between multiple parties.
🔧 Alternative: Using openssl
For those who prefer OpenSSL, here’s how to use AES-256 encryption:
You’ll be asked to provide the same password for decryption.
🛡️ Security Tips
Use strong, unique passphrases — at least 12+ characters with a mix of letters, numbers, and symbols.
Avoid storing passphrases in plaintext.
When sharing files, prefer asymmetric encryption over symmetric if possible.
Back up your private keys in a secure location.
📦 Conclusion
Encrypting files via the Linux terminal is both powerful and straightforward with tools like gpg and openssl. Whether you’re an individual protecting personal data or a business sharing confidential documents, these methods help ensure your information stays safe.
Monero (XMR) is a privacy-focused cryptocurrency that ensures full transaction anonymity by concealing the sender’s and receiver’s addresses, as well as the transferred amount. It utilizes technologies like ring signatures, stealth addresses, and the RingCT protocol to guarantee that all transactions remain private and untraceable.
In May 2025, the value of XMR reached $392.72, driven by several key factors:
1. End of a Multi-Year Accumulation Phase
Analysts have noted that Monero broke out of a prolonged accumulation phase, showing significant price growth.
2. Growing Demand for Privacy
As global regulators tighten control over cryptocurrencies, the demand for anonymous transactions is increasing. Monero, being the leading privacy coin, is becoming increasingly attractive to users who prioritize financial privacy.
3. Limited Availability on Exchanges
Due to Monero being delisted from several centralized exchanges, including Binance and Kraken, its availability has become restricted. This scarcity of XMR on the market contributed to upward pressure on its price.
4. Technical Indicators and Market Sentiment
Technical analysis shows Monero is in a strong uptrend. Indicators such as the Directional Movement Index (DMI) point to a clear advantage for buyers, supporting continued price growth. (Source: reddit.com)
🔮 Future
Considering current market trends and technical indicators, Monero’s price is expected to reach new highs in the coming months. Forecasts suggest it could surpass $525.64 by the end of 2025. (Source: the-crypto-news.com)
✅ Conclusion
Monero remains one of the most reliable cryptocurrencies for ensuring transaction privacy. Its growing popularity, limited supply, and technological advantages contribute to its increasing value. However, investors should remain cautious and consider potential regulatory risks and market volatility.
Bitwarden is an open-source password manager that helps you store, manage, and share your login credentials securely. You can use it personally or as a team/organization.
To install Bitwarden on your server use next steps:
Канал HBO вже офіційно замовив третій сезон постапокаліптичного серіалу «Останні з нас», повідомляє Variety. Це рішення ухвалили ще до виходу другого сезону, прем’єра якого запланована на 13 квітня 2025 р..
Серіал базується на популярній відеогрі з такою ж назвою. Його сюжет розгортається в Америці після апокаліпсису, спричиненого спалахом грибкової інфекції. Головний герой, контрабандист Джоел (у виконанні Педро Паскаля), супроводжує дівчинку Еллі (Белла Ремзі), яка має імунітет до хвороби й може стати ключем до створення вакцини та порятунку людства.
У другому сезоні до акторського складу приєдналися Кейтлін Дівер, Джеффрі Райт, Ізабелла Мерсед і Кетрін О’Гара. Варто зазначити, що перший сезон отримав захоплені відгуки критиків і неофіційно вважається найуспішнішою екранізацією відеогри в історії.
DKIM (DomainKeys Identified Mail) is an E-mail authentication method designed to detect spoofing of email messages
DKIM technology combines several existing anti-phishing and anti-spam methods to improve the classification and identification of legitimate email
Instead of a traditional IP address, DKIM adds a digital signature associated with the organization’s domain name to identify the sender of the message. The signature is automatically verified at the recipient’s end, after which whitelists and blacklists are applied to determine the sender’s reputation.
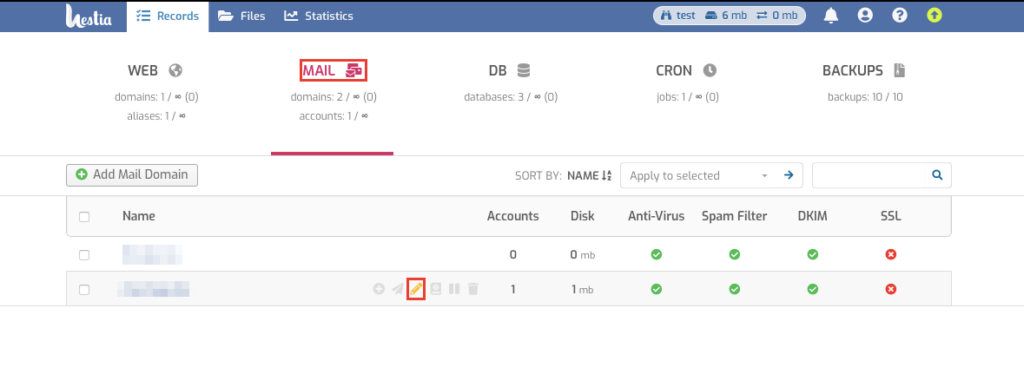
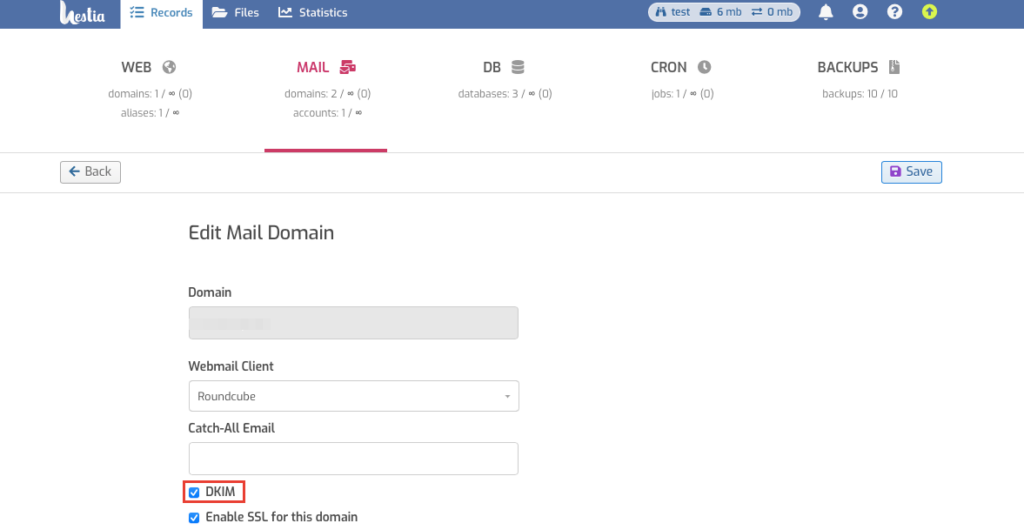
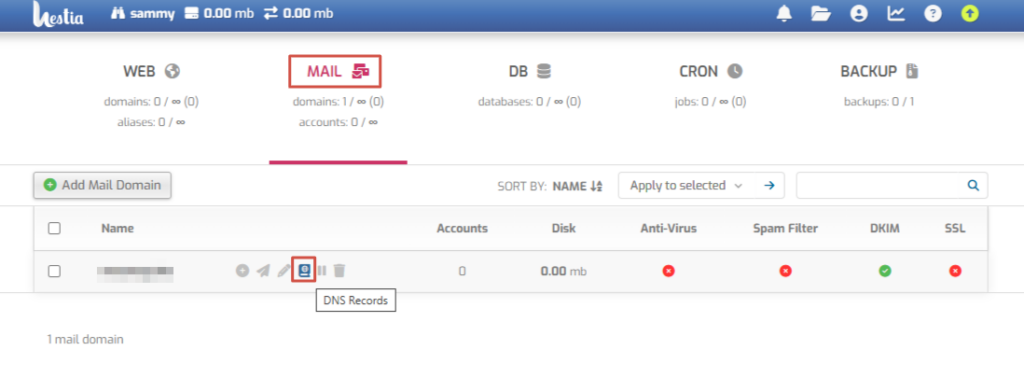
DKIM is configured for each domain, so you will have the option to enable it when you create a domain, as shown in the figure below.
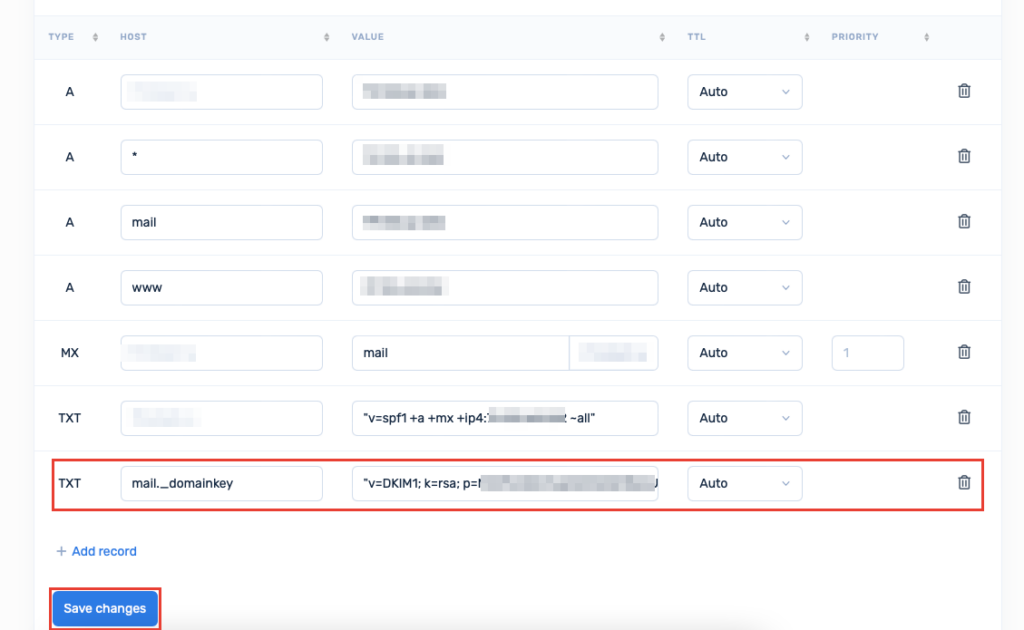
Once the domain has been created, you must now create a text (TXT) record for the domain using its DKIM public key.
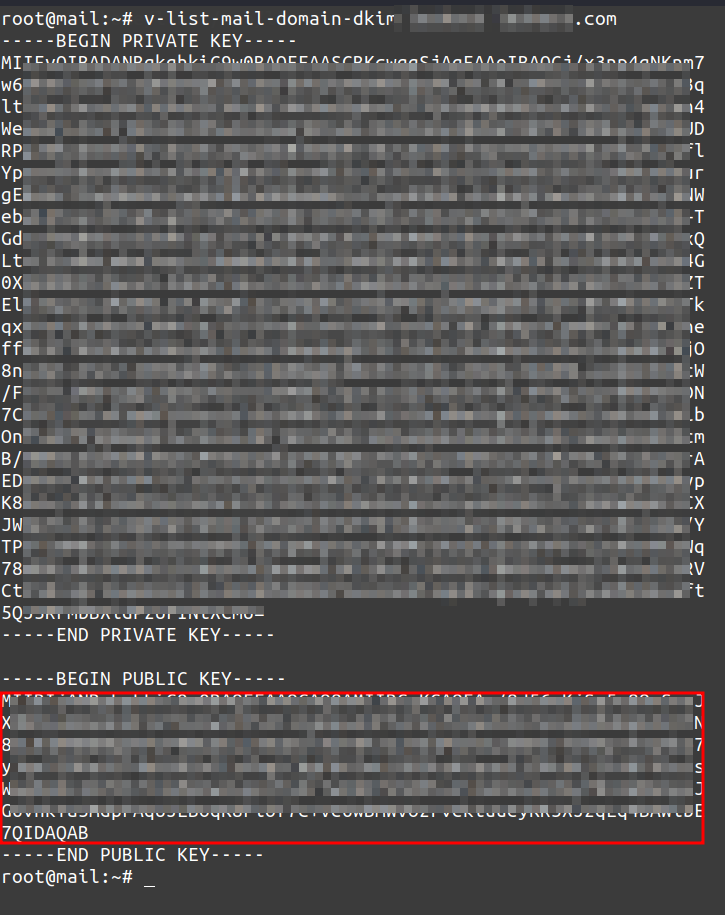
Using SSH and the command you need to get the DKIM public key.
v-list-mail-domain-dkim USER DOMAIN [FORMAT]
Which will take the name of the user in which the domain was created and the domain itself as arguments, you can get private and public keys
The bottom part of the output will be the public key of the DKIM domain.
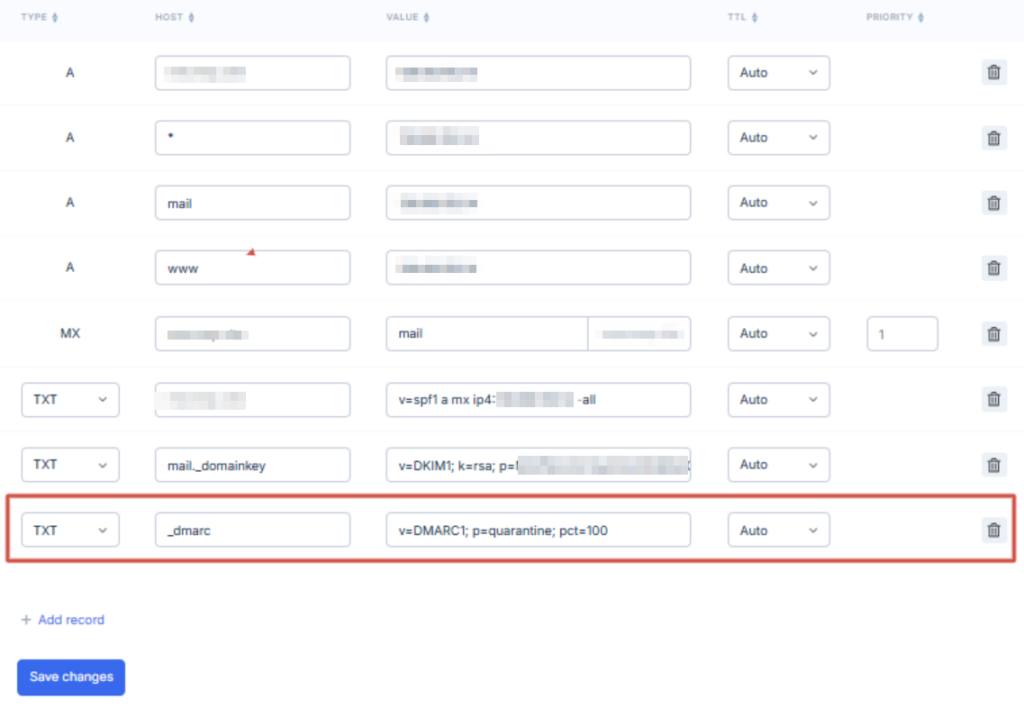
mail._domainkey – entered in the Host field.
"v=DKIM1; k=rsa; p=PUBLIC_KEY"
NOTE: the key must be a single line – if there are line breaks, you must copy the key into notepad and remove them to make one long line.
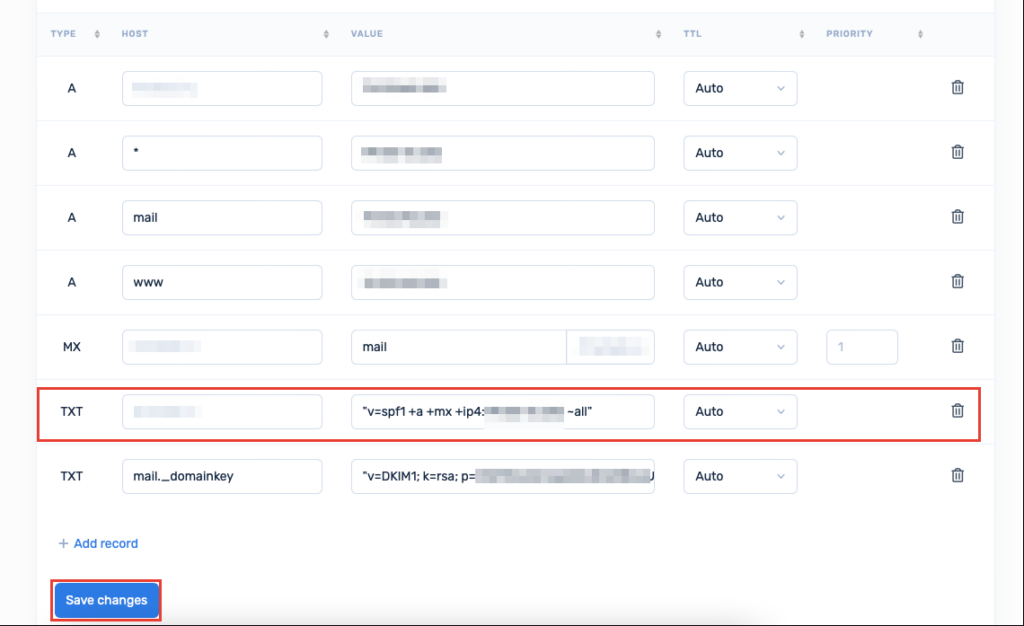
SPF (Sender Policy Framework) is an extension for the SMTP e-mail sending protocol.
SPF allows the owner of a domain, in a TXT record corresponding to the domain name, to specify a list of servers authorized to send e-mail messages with return addresses in that domain. Mail transfer agents that receive mail messages can query SPF information with a simple DNS query, thus verifying the sender’s server. SPF allows you to specify servers and IP addresses that are allowed to send mail from your domains. This feature is designed to block outgoing unwanted messages.
The SPF record is written in the TXT record of the domain. Actually you need to add a TXT record and put the SPF record in its value. In the SPF record you have to specify the server IP from which the messages will be sent. Instead of 111.11.11.111, write the IP address of your server:
"v=spf1 +a +mx +ip4:111.11.11.111 ~all"
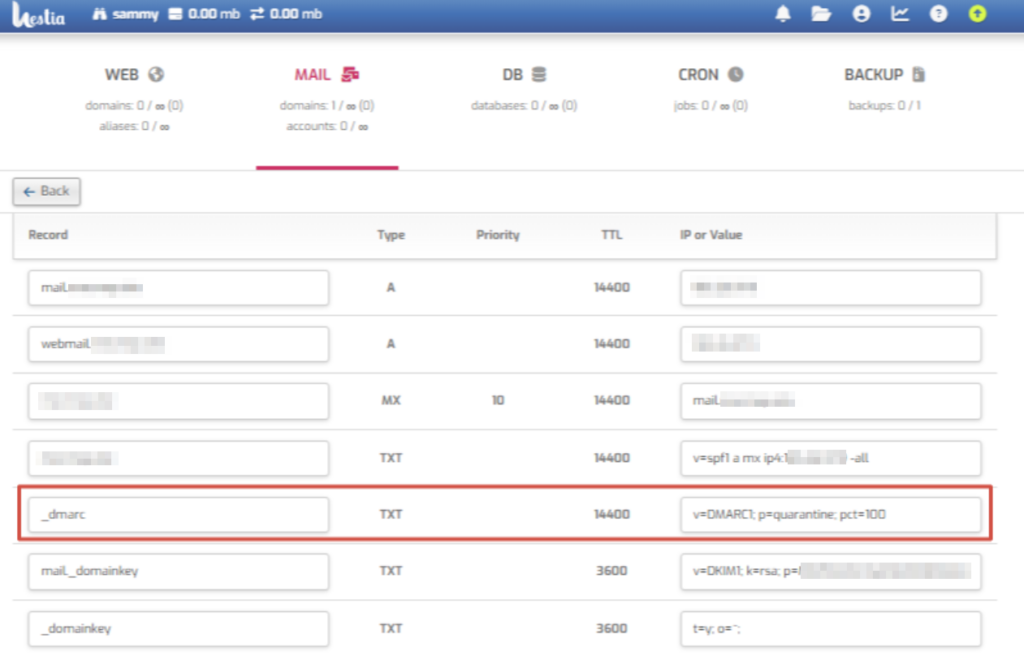
DMARC (Domain-based Message Authentication, Reporting, and Conformance) — a standard that adds an additional layer of email verification and protection against phishing and spoofing.
DMARC allows a domain owner to specify, via a TXT record, the verification rules for messages and the actions that should be performed by mail systems when receiving a message on behalf of the domain. The main purpose of DMARC is to help recipient mail servers recognize fake emails and decide how to handle them.
The DMARC system defines:
Verification Policy (p parameter), which indicates what to do with emails that fail authentication (e.g., none for gathering reports, quarantine for moving to spam, or reject to deny delivery).
Addresses for Reports (rua and ruf parameters), which specify where the data on checks and failures should be sent for analysis by the sender.
DMARC works in tandem with SPF and DKIM, allowing determination of whether messages are authentic. If a message fails SPF and/or DKIM checks, the DMARC policy will decide whether to block it, mark it as spam, or simply send a report to the domain owner.
In the Hestia panel, select the domain for which you want to set up the DMARC policy and go to the DNS Records section.
_dmarc – entered in the Host field.
"v=DMARC1; p=quarantine; pct=100"
Entered in the Value field, you can leave the double quotes for convenience.