Configure DKIM, SPF and DMARC in Hestia CP

DKIM (DomainKeys Identified Mail) is an E-mail authentication method designed to detect spoofing of email messages

DKIM technology combines several existing anti-phishing and anti-spam methods to improve the classification and identification of legitimate email

Instead of a traditional IP address, DKIM adds a digital signature associated with the organization’s domain name to identify the sender of the message. The signature is automatically verified at the recipient’s end, after which whitelists and blacklists are applied to determine the sender’s reputation.

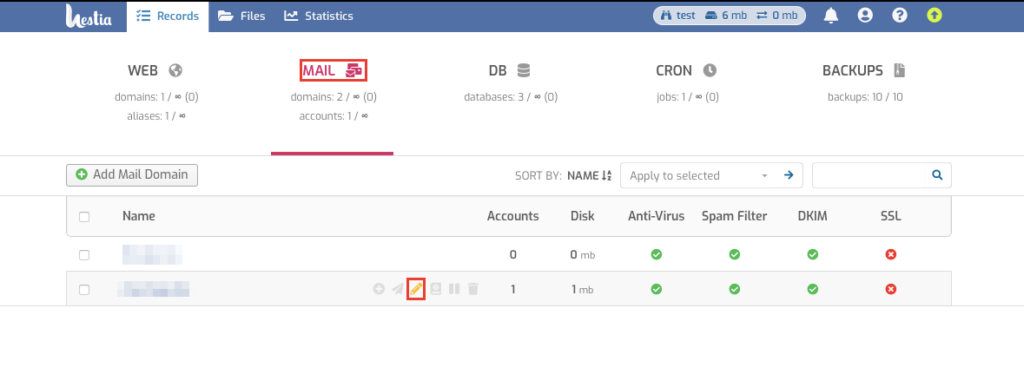
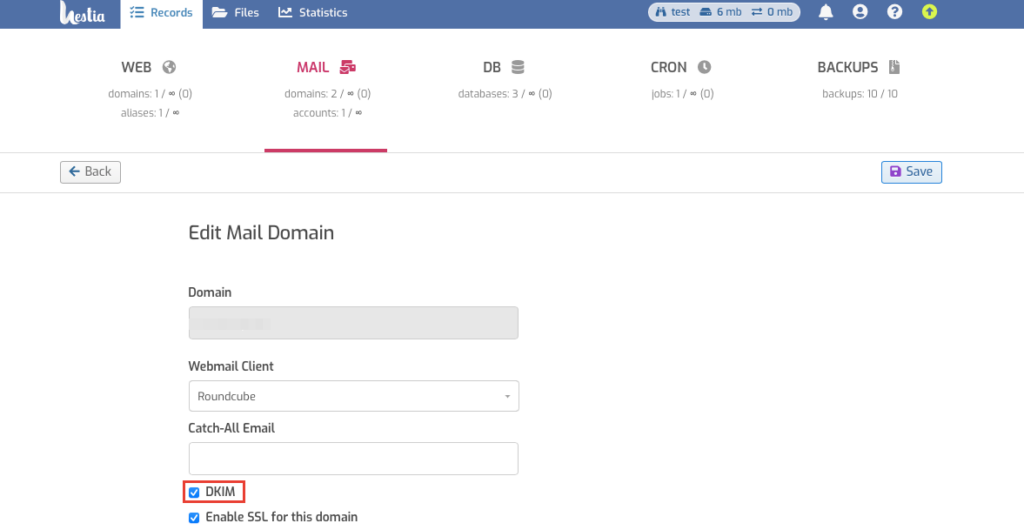
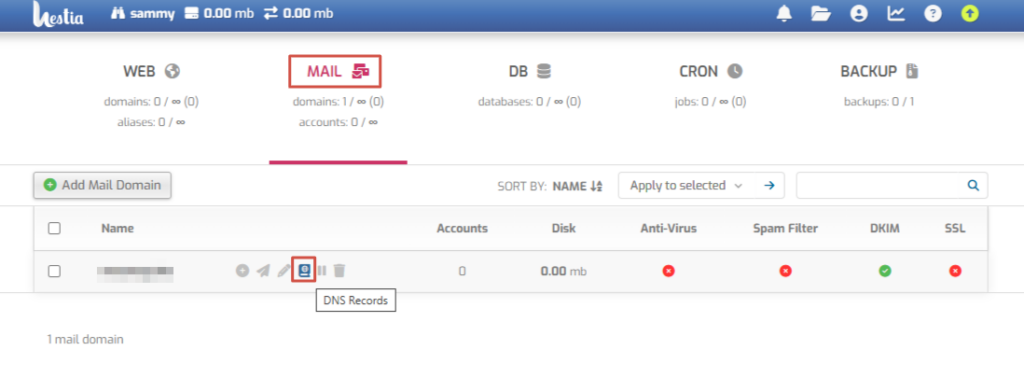
DKIM is configured for each domain, so you will have the option to enable it when you create a domain, as shown in the figure below.

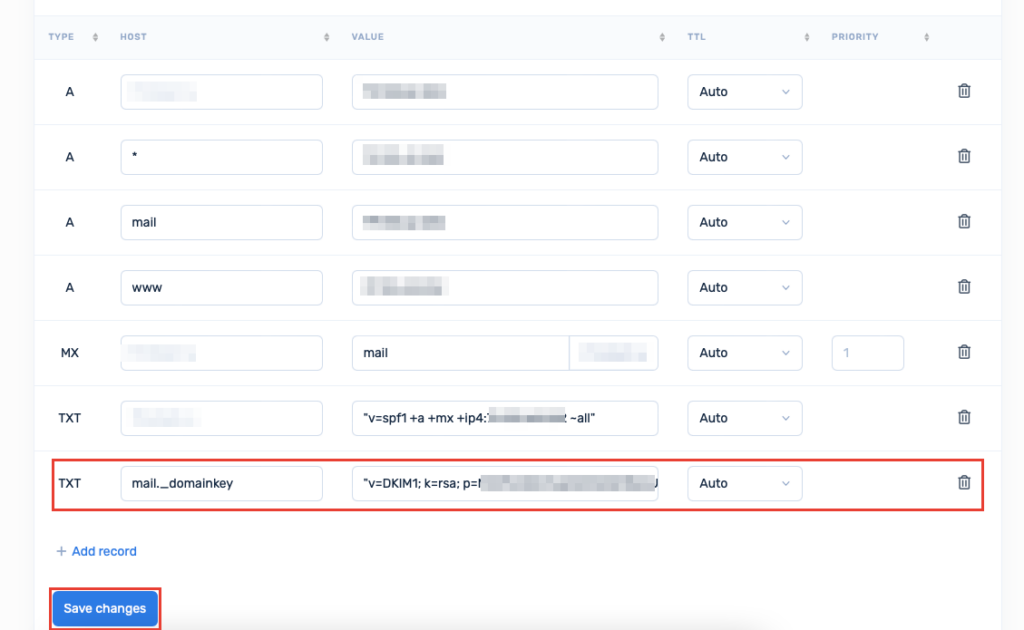
Once the domain has been created, you must now create a text (TXT) record for the domain using its DKIM public key.

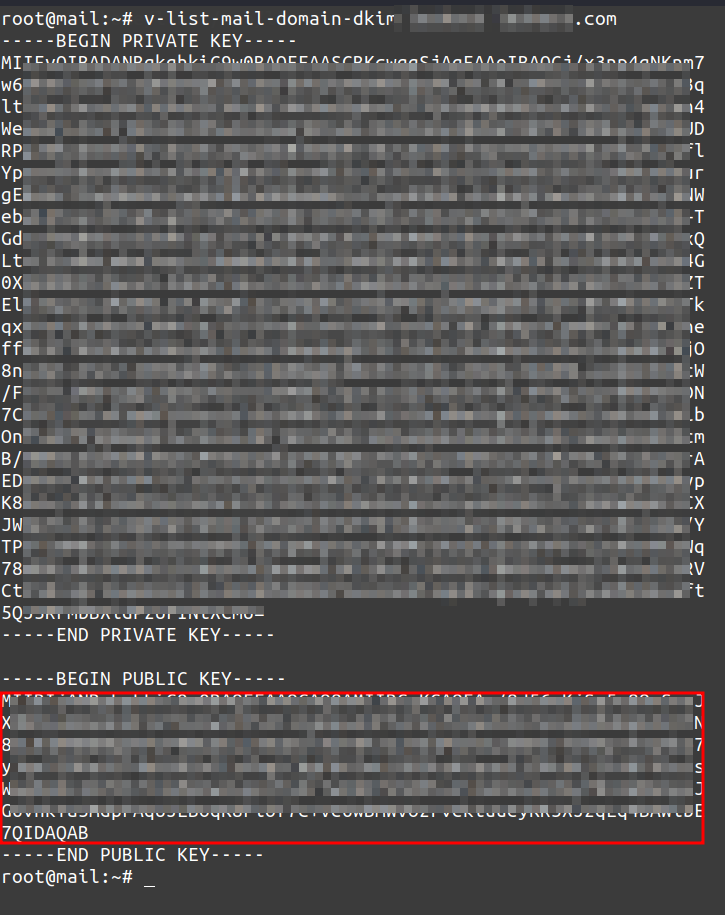
Using SSH and the command you need to get the DKIM public key.

v-list-mail-domain-dkim USER DOMAIN [FORMAT]

Which will take the name of the user in which the domain was created and the domain itself as arguments, you can get private and public keys

The bottom part of the output will be the public key of the DKIM domain.

mail._domainkey – entered in the Host field.

"v=DKIM1; k=rsa; p=PUBLIC_KEY"

NOTE: the key must be a single line – if there are line breaks, you must copy the key into notepad and remove them to make one long line.

SPF (Sender Policy Framework) is an extension for the SMTP e-mail sending protocol.

SPF allows the owner of a domain, in a TXT record corresponding to the domain name, to specify a list of servers authorized to send e-mail messages with return addresses in that domain. Mail transfer agents that receive mail messages can query SPF information with a simple DNS query, thus verifying the sender’s server. SPF allows you to specify servers and IP addresses that are allowed to send mail from your domains. This feature is designed to block outgoing unwanted messages.

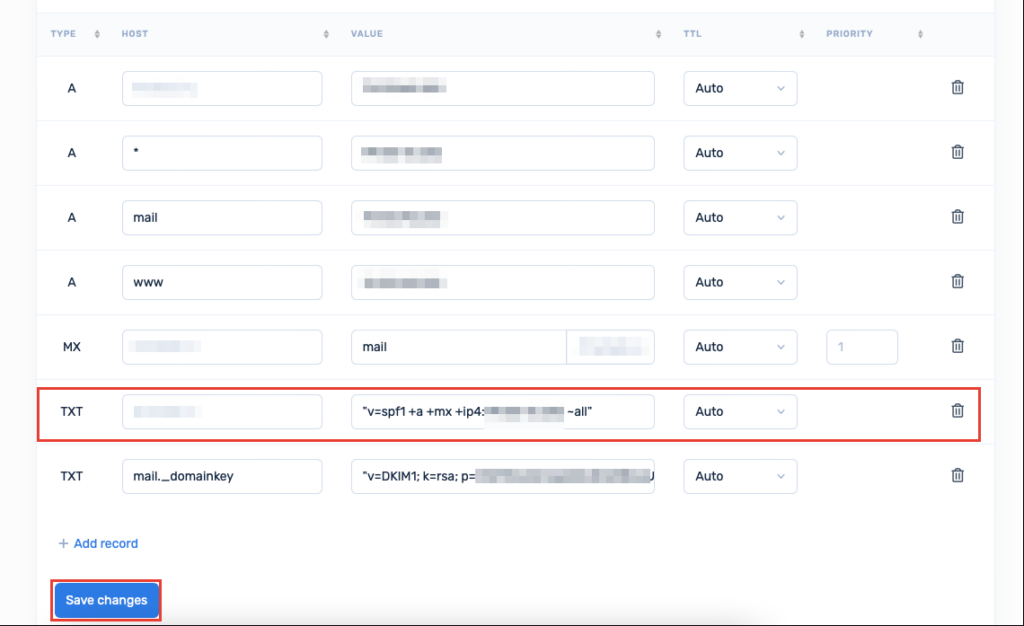
The SPF record is written in the TXT record of the domain. Actually you need to add a TXT record and put the SPF record in its value. In the SPF record you have to specify the server IP from which the messages will be sent. Instead of 111.11.11.111, write the IP address of your server:

"v=spf1 +a +mx +ip4:111.11.11.111 ~all"

DMARC (Domain-based Message Authentication, Reporting, and Conformance) — a standard that adds an additional layer of email verification and protection against phishing and spoofing.

DMARC allows a domain owner to specify, via a TXT record, the verification rules for messages and the actions that should be performed by mail systems when receiving a message on behalf of the domain. The main purpose of DMARC is to help recipient mail servers recognize fake emails and decide how to handle them.

The DMARC system defines:

  • Verification Policy (p parameter), which indicates what to do with emails that fail authentication (e.g., none for gathering reports, quarantine for moving to spam, or reject to deny delivery).
  • Addresses for Reports (rua and ruf parameters), which specify where the data on checks and failures should be sent for analysis by the sender.

DMARC works in tandem with SPF and DKIM, allowing determination of whether messages are authentic. If a message fails SPF and/or DKIM checks, the DMARC policy will decide whether to block it, mark it as spam, or simply send a report to the domain owner.

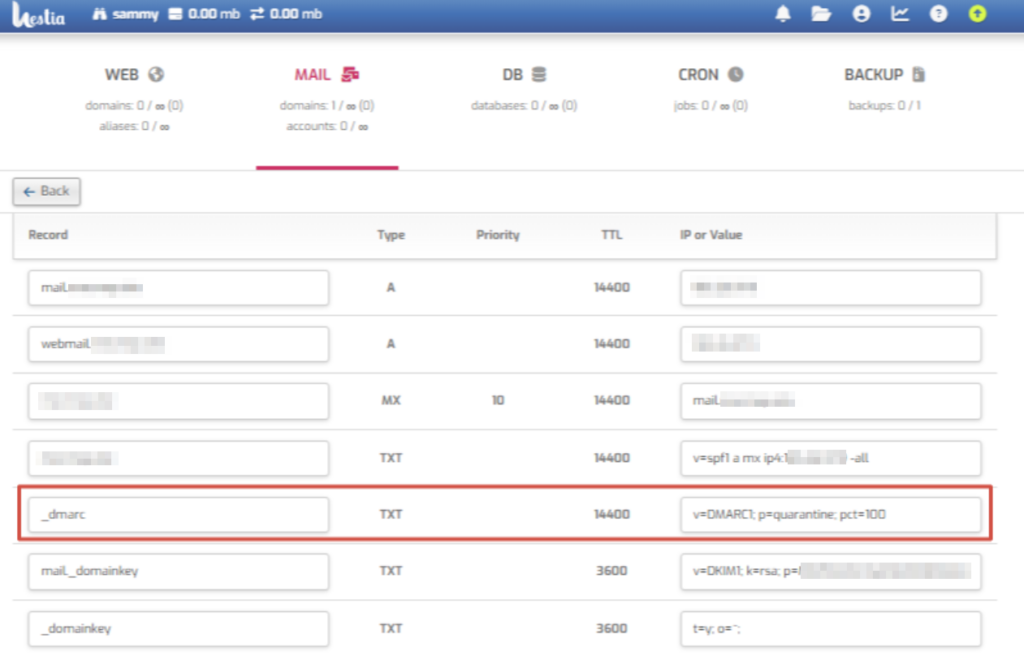
In the Hestia panel, select the domain for which you want to set up the DMARC policy and go to the DNS Records section.

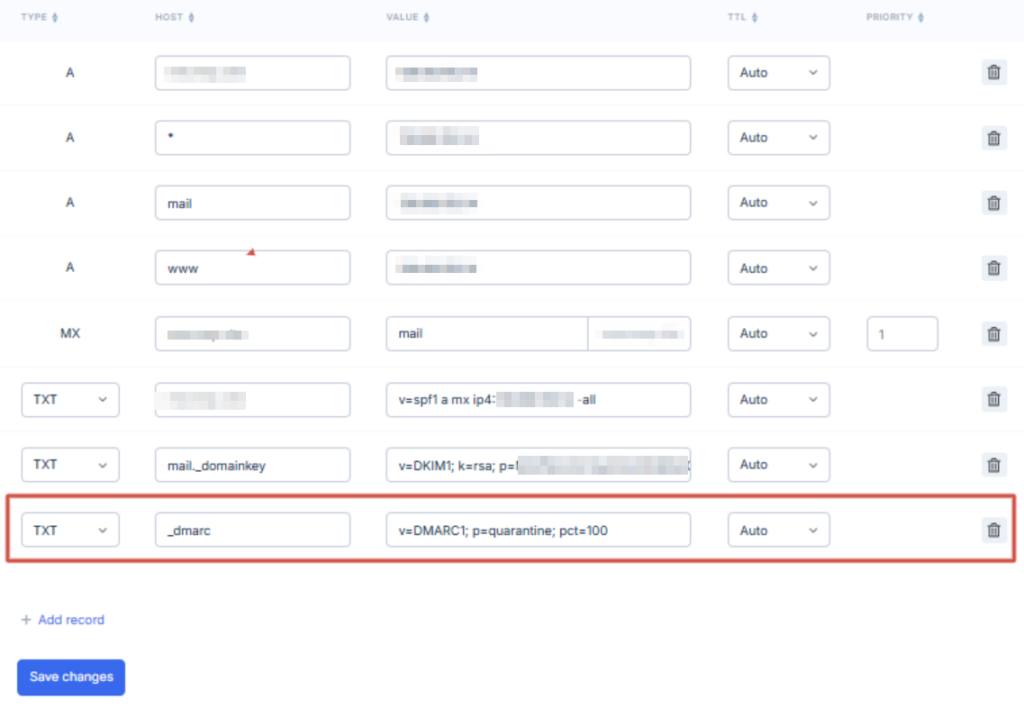
_dmarc – entered in the Host field.

"v=DMARC1; p=quarantine; pct=100"

Entered in the Value field, you can leave the double quotes for convenience.

How to fix error: The repository is not updated and the previous index files will be used in Debian

The error “The repository is not updated and the previous index files will be used. GPG error: https://nginx.org/packages/mainline/debian bullseye InRelease: The following signatures were invalid” suggests that the GPG key for the Nginx repository is either missing, expired, or invalid. Here’s how to fix it in Debian 11 GNU Linux (Bullseye):

1. Remove Old Nginx GPG Keys

Old or conflicting keys can cause issues, so remove them first:

sudo rm -rf /etc/apt/keyrings/nginx*
sudo rm -rf /usr/share/keyrings/nginx-archive-keyring.gpg

2. Add the Correct Nginx GPG Key

Run the following command to download and add the updated signing key:

curl -fsSL https://nginx.org/keys/nginx_signing.key | sudo gpg --dearmor -o /usr/share/keyrings/nginx-archive-keyring.gpg

Verify that the key was added:

gpg --show-keys /usr/share/keyrings/nginx-archive-keyring.gpg

3. Update the Repository Configuration

Ensure your /etc/apt/sources.list.d/nginx.list contains the correct repository entry:

echo "deb [signed-by=/usr/share/keyrings/nginx-archive-keyring.gpg] https://nginx.org/packages/mainline/debian bullseye nginx" | sudo tee /etc/apt/sources.list.d/nginx.list

4. Update Package Lists

Now, refresh the package lists:

sudo apt update

If the update runs without errors, you can proceed with installation:

sudo apt install nginx

To fix error “The repository is not updated and the previous index files will be used. GPG error: https://packages.sury.org/apache2 bullseye InRelease: The following signatures were invalid” use commands:

curl -sSlo /usr/share/keyrings/sury-keyring.gpg https://packages.sury.org/php/apt.gpg
curl -sSlo /usr/share/keyrings/apache2-keyring.gpg https://packages.sury.org/apache2/apt.gpg

How to Grow a Linux Partition with growpart

Resizing Linux Virtual Machine Disks

This article will show how to grow a partition on your Linux partition to fill the entire disk using growpart. This is useful if you have resized a virtual machine disk, or moved to a larger disk on your desktop or laptop Linux system.

Step 1: Listing and Identifying Storage Devices

To expand the filesystem on your resized disk, you’ll need to first locate the disk using the lsblk command, execute it by running:

lsblk

And you will see output similar to the following listing storage devices and the partitions on them:

Above, you can see that disk sda has a size of 50 gigabytes, but that the volume containing the root partition (sda3) is only 29.5 gigabytes – there is unused space on the storage device.

There may be multiple entries in the output from lsblk – you’ll need to identify the disk you have resized by the size and utilization – it should be apparent which disk has unused space. Usually on single-disk machines, the first and only storage device will be named sda.

You will also need to know the name of the partition your wish to grow – in this case sda3 – usually identified by it having the root mount point of /.

Step 2: Installing growpart

growpart is a utility that makes it super easy to grow a partition. It’s part of the cloud-guest-utils package. Note that while this package is intended to work on cloud-hosted virtual machines, the growpart utility also works just fine on physical machines.

On Debian and Ubuntu, run:

sudo apt install cloud-guest-utils

On Arch, run:

pacman install cloud-guest-utils

On RedHat, run:

yum install cloud-utils-growpart -y

Step 3: Grow your Partition

Once growpart is available, growing a partition to use the entire remaining disk space is as simple as running:

sudo growpart /dev/sda 3

You’ll need to specify the correct partition name above, replaceing sda 3 (note the space! the device and partition number are separated when using growpart) if necessary. growpart is executed with no additional parameters – if the size parameter is not specified, it will default to the available size of the partition.

Now that the partition has been expanded, the file system must be also using resize2fs:

sudo resize2fs /dev/sda3

Note that the space has disappeared in the device path again.

You will see output similar to:

Confirming the change. Once this final step is done, reboot:

sudo reboot

How to flush the DNS cache in Debian GNU/Linux?

If using systemd-resolved as your DNS resolver (i.e. the hosts line of your /etc/nsswitch.conf file includes the word resolve and/or /etc/resolv.conf contains the line nameserver 127.0.0.53), then this command will flush its cache:

sudo systemd-resolve --flush-caches

A newer version of this command seems to be:

sudo resolvectl flush-caches

How to convert WMV to MP4

You can use FFmpeg (a free command-line tool for Mac, Linux and Windows) to encode WMV to MP4. Here is an example syntax:

ffmpeg -i input.wmv -c:v libx264 -crf 23 -c:a aac -q:a 100 output.mp4

This will encode the video to H.264 video and AAC audio, using the default quality. To change the quality for the video, use a different CRF value, where lower means better, e.g. 20 or 18. For audio, 100% is the default quality. Increase the value for better quality.

For the AppleTV specifically, this is what Apple says it supports:

H.264 video up to 1080p, 30 frames per second, High or Main Profile level 4.0 or lower, Baseline profile level 3.0 or lower with AAC-LC audio up to 160 kbit/s per channel, 48 kHz, stereo audio in .m4v, .mp4, and .mov file formats

So, you could use the following command to force the 30 Hz frame rate and High profile:

ffmpeg -i input.wmv -c:v libx264 -crf 23 -profile:v high -r 30 -c:a aac -q:a 100 -ar 48000 output.mp4

How to install SSH2 extension for PHP 7.4

If You have an error like: Call to undefined function ssh2_connect() that’s mean that in your PHP not installed ssh2 extension.

Install this extension is very simple, in Ubuntu Linux or other Debian based distribution just use the command:

sudo apt install php7.4-ssh2

This command will install ssh2 extension to Your PHP 7.4. If you use other PHP version, just change number in this command to Your version.

Install LAMP server on Ubuntu

All the components of the LAMP server are available to install using the default system repository of Ubuntu. Hence, we can configure the environment without adding an extra repository. However, before moving forward, just run the system update command to ensure the system rebuilds the APT package index cache.

sudo apt update

Install Lamp server

We can install LAMP server components one by one on our Ubuntu system. However, it is a time-consuming process, hence to make it short here we are using a single command. That will not only install the LAMP server but also enable and start all the required services.

sudo apt install lamp-server^ php

The above command will select all the required packages to set up Apache, MySQL, and PHP on your system.

Uninstall the LAMP Server

Well, when it comes to uninstalling the LAMP server completely from your Ubuntu system, we can use the given command:

sudo apt autoremove --purge apache2* mysql-server* php*

How to Convert PNG, JPEG to WebP in Linux?

Webp is an open-source image format in Linux which supports lossless and lossy compression for images on the web.

One of the best practices to optimize the website performance is using compressed images.

This article will cover how to use webp image format for creating compressed and quality images for the website.

Installation

The webp package is already available in the official ubuntu repositories. Run the command below to update the Ubuntu repository to the latest index and install webp package.

sudo apt install webp

Converting image to webp format

Using the cwebp tool, an image can be converted into webp format. Run the cwebp command with option -q to define the quality of image and -o to define the output file.

In this example, I have used image file linux.png and linux.jpeg file to convert in webp format. You can choose your image name accordingly.

cwebp -q 60 linux.png -o linux.webp
cwebp -q 60 linux.jpeg -o linux1.webp

Converting webp image to png and jpeg format

In the previous step, we converted jpeg and png images to webp using cwebp utility tool. Now we will use the dwebp tool to convert webp images into png and jpeg format.

Use the dwep command with the option -o to create png and jpeg image format from webp. In the example, image.webp is used for the conversion.

dwep image.webp -o image.png
dwep image.webp -o image.jpeg